Ray C140W Deck Pod install, a dubber’s impressions
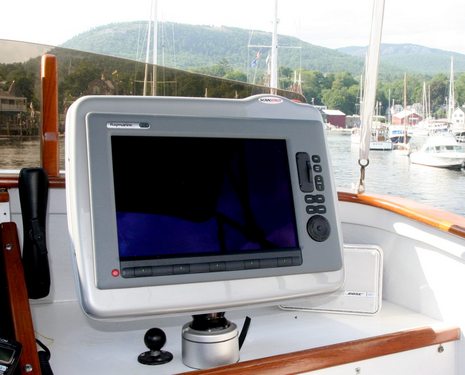
Yes, I’m frustrated that a combination of weather, travel, and gizmo glitches has so far prevented me from getting this Raymarine C140W and the attached RD418D Digital Radar operational, and then comparing it with Navico Broadband Radar (and Garmin HD radomes, too), but it was educational to install the MFD in that new Scanstrut Deck Pod. The completed rig is quite slick: the “silver” finish goes nicely with Ray gray, I think; all the cables pass easily, and invisibly, through the base; and the whole pod angle adjusts smoothly but locks up solid with that lever (which, after a little tweaking, now goes tight against the base when locked). But putting it altogether was a little challenging…
For one thing, do you notice that the MFD is not perfectly square in the Pod? It’s not really obvious because the lines are so curvy, which is also why it’s hard to get right. I’ll take a large portion of blame as I rushed the install, and am something of a dubber anyway, but it seems to me that Scanstrut could have molded grid lines into the back of the faceplate (and perhaps could stick on a grid label now).
Actually cutting the face plate was fairly comical. The thick plastic drills easily, but when I tried to cut my lines with a jigsaw, the melting plastic welded shut behind the blade (doh!), and I tried a couple of different type blades. A carefully plunged skill saw did the job, though, and again note my dubber status (back in the day, dubbers were the guys who trimmed off treenails and excess planking with adzes, i.e. the least skillful workers in the yard).
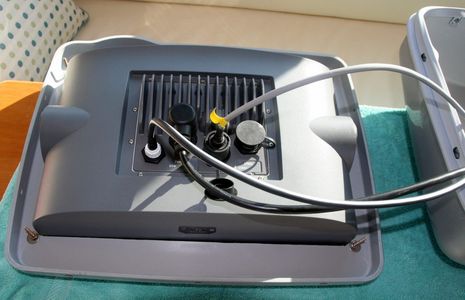
It was a bit touchy getting the faceplate to fit over the Pod back without displacing the silicone gasket. Rob Emmet of Pyacht.com commented in the original Deck Pod entry that they used “sailmaker’s seamstick tape” to hold the gasket in place. I got away without that, somehow, but Scanstrut might consider including some in the kit or adding the suggestion to the instructions (though, full disclosure, dubbers like me misplace them). Note, too, that Scanstrut uses several unusual, and hence theft proof, bolt head types on the Deck Pod, but only includes an allen wrench for one of them. You may need to expand your bit collection.
Incidentally, check out the C140W’s cable set. That big right-angle plug, while not backward compatible, nicely takes care of power, a video input, and several NMEA 0183 ports (unused by me, thanks to the SeaTalkNG/N2K port). And I was glad to find two SeaTalkHS/Ethernet ports, as that means both the radar and the DSM 300 sounder module Gizmo already had can be attached without a separate switch box. A short crossover cable is needed for the radar’s Ethernet cable, however, which is a dite dissappointing as other manufacturers seem to have figured out how to handle switched or straight thru Ethernet without crossovers. But the triple MFD/radar install is almost complete, and I hope to be testing, and cruising, later this week.





Ben – What’s on the other end of the cable that the right angle plug attaches to? Is it something reasonable to get through a 1″ binnacle tube that already has other cables going through it?
Rob Emmet reports that an “incredible” tool for doing MFD cut outs is the the Fein Multimaster, which I have drooled over at Jamestown:
http://tinyurl.com/lp8wt6
I have the Fein and it is the wonder tool, also a trim router with a 1/4″ straight bit is the best tool for cutting thick plastic (or aluminum covered with fiberglass). As for the Scanstrut, I’m glad to see that Navpod gets some competition.
The melting plastic welding behind the blade has got me before. Someone told me to try sticking sellotape (scotch tape) over the cut lines before sawing. Seems to work a treat, I think it gets mixed into the plastic as you cut and stops it welding up.
Try using a coarse jigsaw blade. Its the plastic chipsfrom the cutting that weld the pieces back together. Larger chips and a wider kerf from the thicker blade allow the chips to fly out easier and prevent the welding back together. When this happened to me, I very reluctantly tried the coarse blade, thinking that it would tear the plastic up, but it worked great!
I borrowed a Multimaster to do this short of install from a friend. He’s been gone for about a month visiting family. He may not get it back!
At first I resisted the urge to spend $400 on the total package from Fein, but I’m anxious to buy one now. I’ve used it to make some cut in tight spots that would have been impossible to reach with a jig saw, and the tolerance is tight. It won’t dance around on you and make stupid curved lines.
The melting plastic has I think got most of us before. I found for me the solution to be just slowing down the saw speed so it doesn’t generate the friction/heat. No Heat = No melting.
Well, I was close. I did try a wide kerf jigsaw blade, and I had tape on both sides of the cut to prevent scratching. But I guess I was going too fast, and think I could have sawed all day and still had a solid, if badly scarred, panel. Dubber!
In softer plastics I run my jigsaw at a very low speed and use a coarser blade. I have the Fein tool but I’m still learning its “feiner” points. just being able to make a flush plunge cut pays for it first time! Dubbers take note.
I like a rotozip for more rigid material, and for composite panels, using it like a midget router.
I use the Rotozip for everything, Plastic, Fiberglass & Wood , leaves a nice clean cut,
Well, it turns out that the new C-Series do have auto-sensing Ethernet ports, and that the crossover device is simply being used to get a large, waterproof Ethernet plug to the back of the unit without having to snake it down a mast. Raymarine’s Jim McGowan with the whole story:
“I wanted to shed some light on the reason the crossover coupler is recommended for the radar installation.
First, the crossover coupler itself is a stock part that we had in our inventory that came about with the original release of E-Series. These original SeaTalk HS (Ethernet) units did require some direct-connected components (originally the DSM300) to be crossed-over. This was usually only the case on small systems that had only a single SeaTalk HS device networked to the E-Series display. Larger systems would always have a SeaTalk HS Ethernet Switch in there to accomodate multiple devices, displays, SIRIUS weather recevers etc.
One improvement that we’ve made in C-Series widescreen hardware (as well as in all of the other SeaTalk HS hardware) is that it’s 2 built-in ethernet ports are actually auto-sensing. They will adapt automatically to whatever is connected to them, regardless of whether the cable is straight-through, or crossed over.
The other thing the Crossover Coupler brings to the equation though is a waterproof, slim diameter, inline ethernet coupling. The waterproof twist-lock SeaTalk HS ethernet cables are too big to easily pass through a bulkhead, or down a pipe. By bringing the Crossover Coupler into play the installer can make the waterproof connection at the C-Series Widescreen with the stock twist lock and pass the smaller diameter Ethernet RJ-45 through the tight spots. The installer can even remove the clear RJ45 end, and fit a new one after the cable pulling is done. Then, using the crossover coupler we can easily mate that cable to the radar scanner’s cable with a simple, watertight connection using the crossover coupler.
This is also a great plus for sailboat installations, where you would traditionally always find a splice in the radar cable at the base of the mast. While creating a splice in the power leads was usually trouble free, splicing the other 10+ tiny data and communications wires was always risky, and became a point of entry for RF interference, moisture intrusion and other issues if not done and maintained correctly. With the Crossover coupler options, we have significantly improved the reliability of that connection, and made it simple to connect and disconnect when necessary.
From a manfacturing and dealer/retailing/installing standpoint offering the Crossover Coupler made it possible to significanty reduce the number of SeaTalk HS network cables that needed to be stocked by 50%. This significantly reduces the SKU count that a dealer must carry, and cuts down on possible confusion at installation.
Without the crossover coupler, we would have needed to make both straight-through and crossover wired cables in all of the various lengths. The number of boats that install any of our SeaTalk HS displays with only one other SeaTalk HS peripheral is very, very small small. Almost all of them have at least a Digital Sounder Module and one other device like the SIRIUS weather receiver, digital radar, or a second display. As soon as the number of SeaTalk HS devices hits 3 or more, the Network switch comes into play.”
Hi Ben,
Please note that we now bond the seal/gasket to the back of the pod during production, which will make fitting easier for the installer.
Cutting techniques vary greatly, and whilst we don’t recommend a particular jigsaw, we do advise slow saw speeds.
We also have a range of pre-cut models available in the USA, for common electronics including Garmin 4200 and 5200 series, Raymarine C and E series, and the new C-series wide.
You’ll be able to slot a new raymarine E-series widescreen hybrid touch into that space with its almost-identical form factor (just slight differences in rear connections) http://www.hybridtouch.com for the highlights.
I’m biased but I think you’ll be pleased with what’s been done.