Changing transducers — “So you have a 5200 problem?”
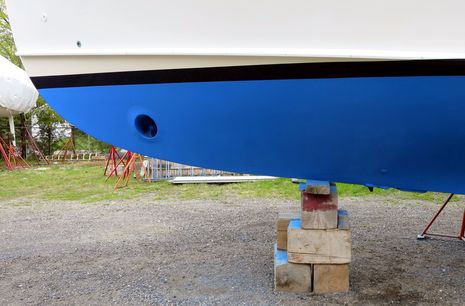
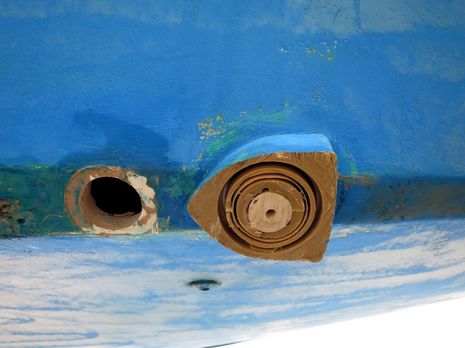
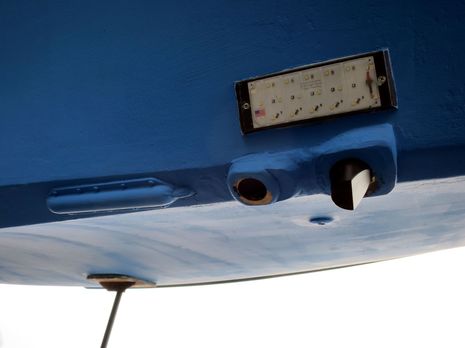
I’m tentatively proud of Gizmo’s 2014 forward transducer installs (which you can see better by clicking on the photo above). I knew it would be hard to remove the three ducers installed there in 2010 and “mistakes were made” during the replacement phase, but I’m fairly sure the boat is set up now to properly compare EchoPilot FLS with ForwardScan, and I also look forward to checking out the manly HD version of Navico StructureScan. Plus, there are yet other possibilities for the forward retractable casings and two new fixed transducers back aft…
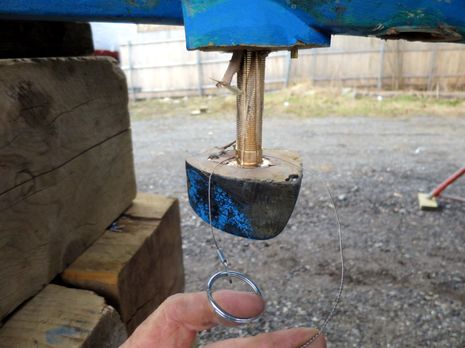
The biggest problem was removing the big old Interphase FLS transducer, which I had installed with liberal quantities of 3M 5200 adhesive/sealant. Yes, it’s recommended for permanent bonds, and I’ve seen fine hardwoods fail before a good 5200 joint, but a protruding transducer on the keel could be easily knocked off in a hard grounding. I figured that wicked tough 5200 would maximize the possibility that the transducer would shear off instead of pulling its stem out, thus leaving the boat with a significant underwater hole. At any rate, I asked around and did some Googling, and one trick I came up with was the $4 Coghlan Pocket Saw you can see in the photo above. It did a nice job of separating the transducer and 5200 layer from the fairing block that I hoped to retain for the EchoPilot casing. But, as indicated by the scars on the transducer stem, more brutal techniques were required to get the darn thing to drop out of the boat…
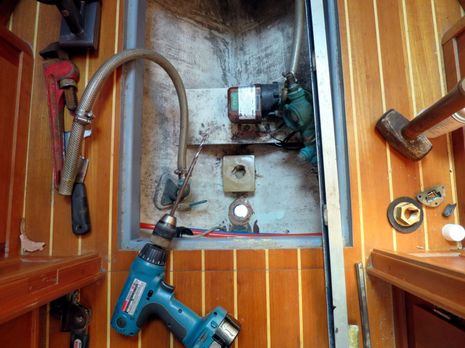
Here’s the bilge access in Gizmo’s forward cabin, a significant reason why installing transducers here makes some sense. Note the pipewrench, two-pound maul, and most especially the long tapered electric drill bit. What ultimately got the old transducer to move was drilling around the stem — not a problem as the Echopilot casing required a bigger hole — and also injecting the area with some special gunk. But before discussing that, I’ll add that it was relatively easy to remove the old plastic housing for the DST800 to install a similar-size bronze Airmar B617 valved housing that will accommodate either the DST800 or the coming Simrad ForwardScan transducer. Note also the air conditioner and head flush water seacock hose that I detached, as it figures in the comedic end to this tale…
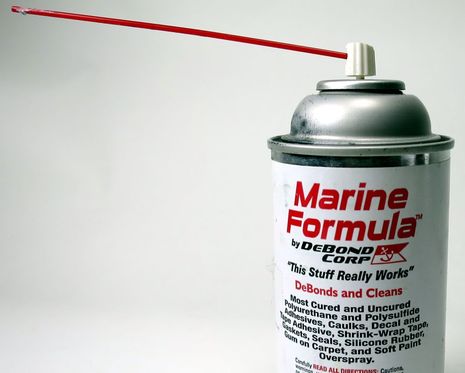
I can attest to the DeBond Marine Formula slogan, “This Stuff Really Works,” and that includes 5200. In fact, when I asked about DeBond at my wonderful local Hamilton Marine outlet, the savvy salesman’s immediate and deadpan response was, “So you have a 5200 problem?” Well, I explained, not really a problem (as the forward bilge has been bone dry ever since the 2010 install), but I am going for a redo. DeBond is not magic. It won’t melt 5200 so you can simply reverse an install, but it does slowly work away at the bond between the polysulfide and whatever surface it’s adhered to, and you can speed that process with a knife, wire saw, or drill.
Now, how do you make a small hole into a big hole? Hole saws have a center guide bit and are very hard to control if that bit is spinning in air. The trick was a set of Plastimo tapered wooden plugs (that are smart to have onboard anyway). I hammered one into the old Interphase hole, sawed off the remnant, and proceeded to use every size of hole saw I have between the EchoPilot’s 2.5″ stem diameter and its 3.25″ flange, the idea being to fair the flange into the already vertical Interphase block. That part went well, but please bear this in mind: When you dry fit a transducer housing, make sure you not only apply the interior nut, but also make sure there’s still enough thread left to snug down the transducer or blank plug. Also, be darn careful during the final install not to cross thread the nut so that you can’t tighten it properly and also can’t remove it. And be aware that a combination of those errors might lead you to call your daughter on a Sunday evening to squat beneath your boat with a wrench so you can desperately undo the 5200 mess you’ve created!
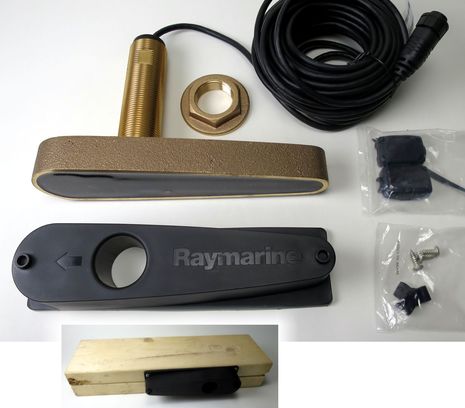
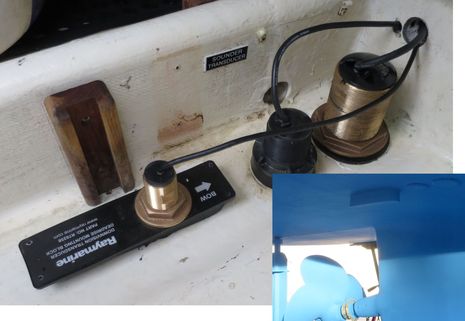
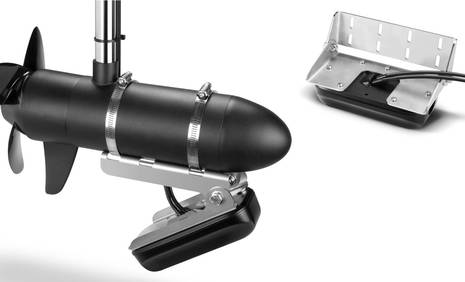
The aft transducer install went much more smoothly. The above photo shows the nice fairing block that comes with the Raymarine CPT-120 CHIRP sonar and downview transducer, and the inset illustrates how you can use its squared off flange to temporarily mount the block so you can run it safely through a tablesaw tilted to match the deadrise of your hull…
And here’s the finished install well aft of the forward transducers but forward of the propeller. The middle transducer is an Airmar 50/200 kHz that came with Gizmo and has served well with various Raymarine MFDs over the years. Finally, most forward is the new Airmar B75 medium frequency (80-130 kHz) CHIRP ducer that I’ll be able to switch between Garmin and Simrad displays. It’s nice to add that I took the main photo yesterday, more than 24 hours after the boat was launched, and the area is completely dry. (There will be a future entry about that blue water-based copper-free Pettit HydroCoat Eco anti-fouling paint I’m also testing.)
Unfortunately, it took a whole day to assure myself that the forward transducers are also completely sealed. That’s because I’d left that hose undone and it turned out that having the seacock shut off does not mean that the seacock is shut off. Which made for some busy moments as Gizmo sat in the travellift slings and I’m not happy about driving around for 18 months with a failed seacock, though I do have those tapered plugs. Oh, and I also have a Macris underwater light mounted near the forward transducers. I think that underlighting the bow may look pretty cool, plus the light could be useful if I ever come across a camera that fits in either the 2- or 2.5-inch casings. Note how I wedged the future ForwardScan casing to get it vertical and tried to sculpt the fairings hydrodynamically. I’m not sure how I did, but poor fairing should show up as a drastic drop in performance as speed increases. Testing is still a few weeks off, however, as I’m also replacing almost every other electronics component on poor Gizmo. It seemed like a good idea last fall.





After struggling to enlarge holes with a hole saw in the past, I recently discovered this: http://www.amazon.com/Bosch-HE1-Hole-Saw-Enlarger/dp/B000WA7A56 . It makes enlarging holes with a hole saw much easier.
I suppose you will be doing inshore surveys with the vast array of depth sensors you have now. It will be interesting to see the charts you produce.
Also an excellent time to remind everyone to check seacocks regularly. I check mine during haulout by hooking up a garden hose to the inboard end to see how bad they might leak.
Cheers
That’s clever. The tools lets you chuck two hole saw blades at once, with the smaller diameter one forward to act as the guide. Thanks, Mark!
I lecture friends ever year… only use Sikaflex 291 or 291 LOT (Long Open Time) or 3M 4200 for transducers.
Do the work two weeks before launch, dry fit everything first to ensure the hole is square. Then once you are ready for sealant, don’t fully tighten things up, wait a day or two, then apply the final torque to it.
5200 is for permanent bonds, and 5200 Fast Cure, while good isn’t as strong. I used to use 5200 FC because I was in a hurry on a hull/deck joint, failed after 3-4 years, Regular 5200 never fails… to stick or break misfitted transducers.
Good point, Don. That seacock looks fine, and its valve stem seems to turn smoothly with the handle. But water was shooting out of the hose at the same rate no matter which way I put the handle. I’m having a hard time imagining what is broken inside. I’m also unfamiliar with that particular type of seacock. Anyone know what may be happening?
I have used heat on a bronze transducer through-hull to get 5200 to release. With the transducer removed, apply heat with a propane torch to the inside of the bronze through-hull opening. Use a handheld type of propane torch used by plumbers. When 5200 reaches 500 degrees F it will release and the through-hull can be removed with a few hits from the mallet, (from inside the boat).
The tricky part is not allowing the bronze to heat the fiberglass hull it is mounted in. This is why you need to keep a charged hose at your feet. The sequence goes like this – heat – try the mallet and heat again until a few hits start the bronze to move. Once it starts to move stop heating and keep extracting the through-hull. Once you get it separated from the hull by a half inch you can usually get a pipe wrench on it from outside and rotate it out of the boat. Having an assistant do the hitting from inside the boat while you are heating from the outside helps make this a quick process, however I have done it singlehanded. Just be very careful with the heat and keep it off the fiberglass.
Uh, Ben – How are you going to hook up all those transducers for testing? Don’t they all have specific connectors on the sounder ends depending on which sounder you’re using? I assume you have a plan to operate only one transducer at a time to avoid echo interference from each other….
One more thing: The fumes from heating 5200 are highly toxic so use a mask.
Can’t enlarge the photo showing the seacock, but it looks like a GROCO. From your description, it appears that the shaft and the ball have separated….hard to say. In general GROCO seacocks are very good. They did have the miserable experience of having castings made overseas and I understand that the supplier didn’t adhere to the GROCO specs. GROCO replaced all seacocks already sold, so I would trust them.
Good luck!
Don
Good Job Ben, the $4 saw was an excellent idea, I just bought one. It will be useful for other things also methinks. Adding to the tool list, I have collection of wedges made out of Starboard, cat paws (I de-claw them first so I don’t get scratched) and a 4″ angle grinder to remove recalcitrant transducer nuts in tight areas where I can’t get any leverage. An extensive pejorative vocabulary is a must for these jobs. I’m interested in the results you’re going to get. The Interphase stuff was always a little too inscrutable for my taste.
In an emergency or when you cant put your hands on a pocket saw a steel fishing leader with a large key ring on each end may help get the job done.
I would be concerned about turbulence affecting the aft transducer even at low speed
Hope to be testing soon, Allan, but am not too concerned. Do you realize that the large Interphase transducer (photo #2) was the most forward of three for the last four seasons? A StructureScan and a DST800 transducer worked quite well behind that big lump, except for the paddlewheel. They always performed up through the 10-12 knot range and often faster if not too rough.
Hi Ben,
I mounted the Interphase forward looking sonar on our 42 sailboat hoping it would be useful for gunk-holing in shallow coastal areas. With the boat at rest in calm water it would “see” underwater objects with satisfying clarity, but when the boat was moving, or there was any turbulence, its ability to see things diminished rapidly. It turned out to be of little use and I replaced it with a conventional Airmar sounder. I hope your experience is better.
Bears repeating: “An extensive pejorative vocabulary is a must for these jobs.”
Hi Ben,
I just wanted to let your readers know that there is another alternative for removing 5200 called Unhesive. It is a 5200 remover developed by a chemist in Florida. It doesn’t use stinky or slick solvents or petroleum based materials, but rather a mild water based chemistry which releases the adhesive bond between 5200 and the substrate. Can’t hurt wood, fiberglass, aluminum, etc., and doesn’t leave an oily residue or stains on the deck.
You also get a big 8 oz bottle rather than a tiny 1oz spray can, so it is great for larger projects. Also removes expanding foam and some other adhesives. Great stuff. See http://store.marine beam.com/unhesive-5200-remover.html
Jeff