
Victron’s Venus OS on a Raspberry Pi, install and configuration
The Victron Remote Management (VRM) portal and their Venus OS monitoring software deliver best-in-class access to information about your boat (, RV, or fixed solar) electrical sytem. But, running one of these systems has typically required Victron hardware which starts around $300. Victron has a long history of embracing the open-source community and they’ve continued that effort by supporting Venus OS on a Raspberry Pi. But, many people hear Raspberry Pi and either think dessert or that it’s over their heads and too complex. This guide walks you through the steps required to get Venus OS up and running on a Pi and sending data about your electrical system to VRM.
The technologies
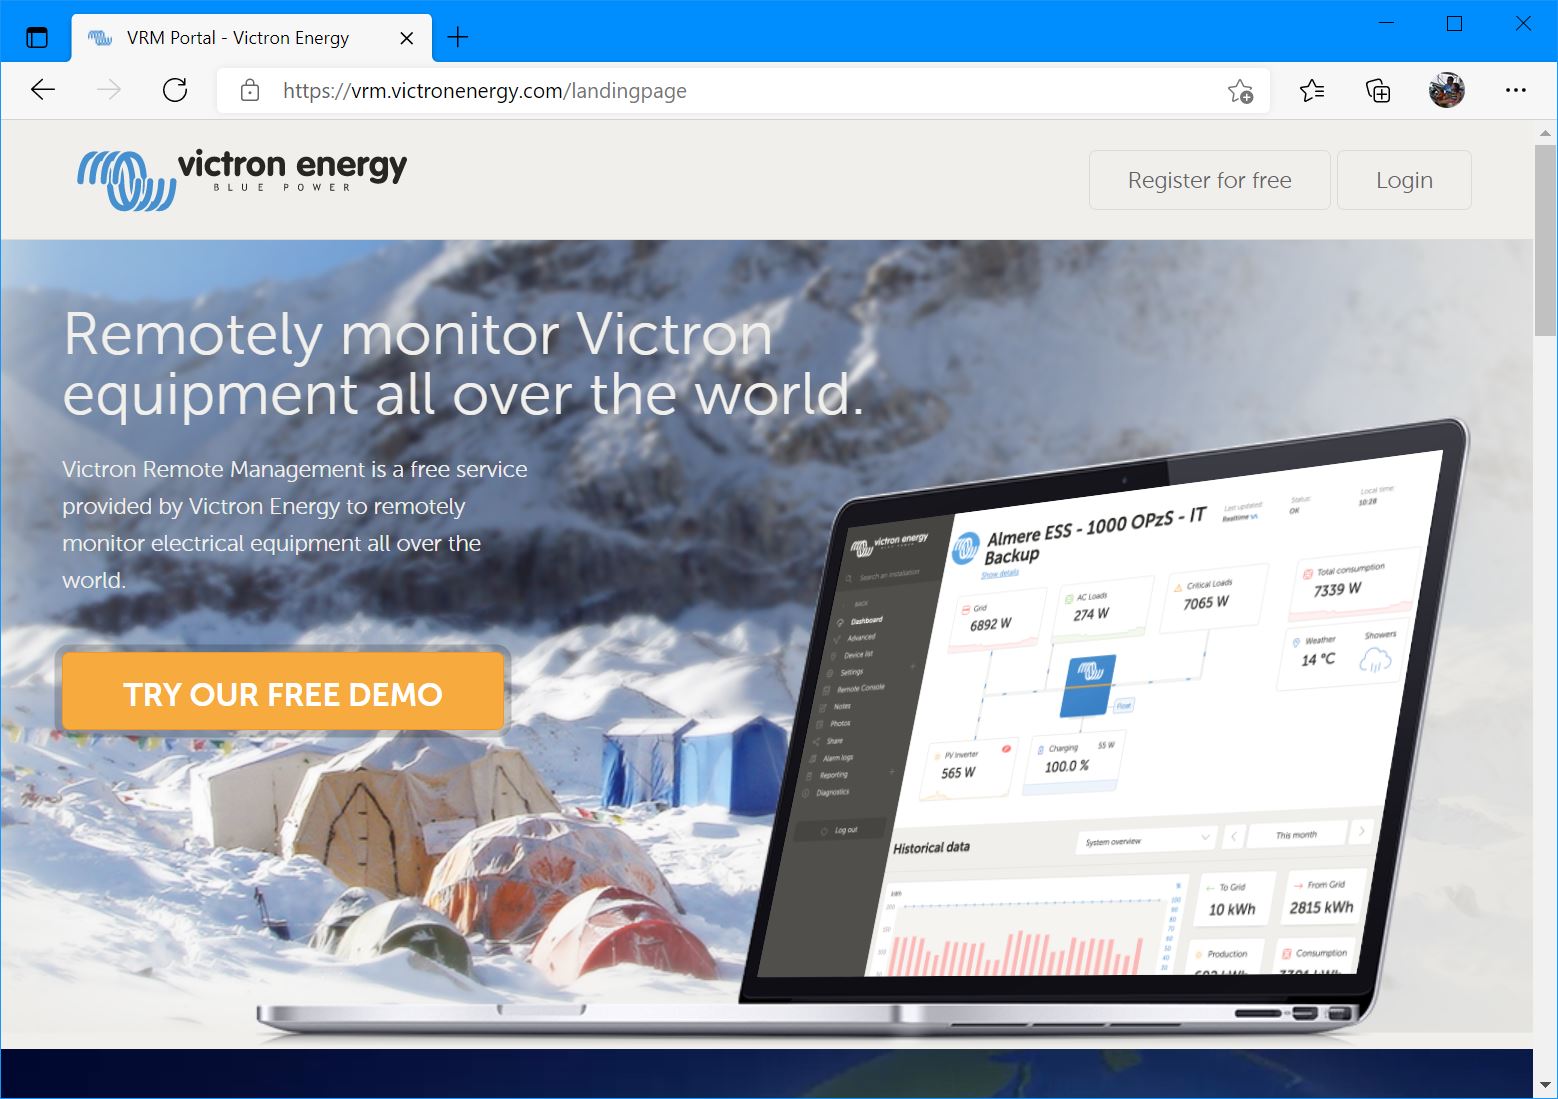
Victron’s VRM is their powerful portal that integrates all the information collected from Victron electrical equipment installed on your boat (or RV or land-based solar installation). VRM receives data from a device running Victron’s Venus OS. Typically a Cerbo GX, Color Control GX, or Venus GX. But, when you’re done with this guide you will also know how to use a $35 Raspberry Pi to collect data, display it on your boat, and send it to VRM.
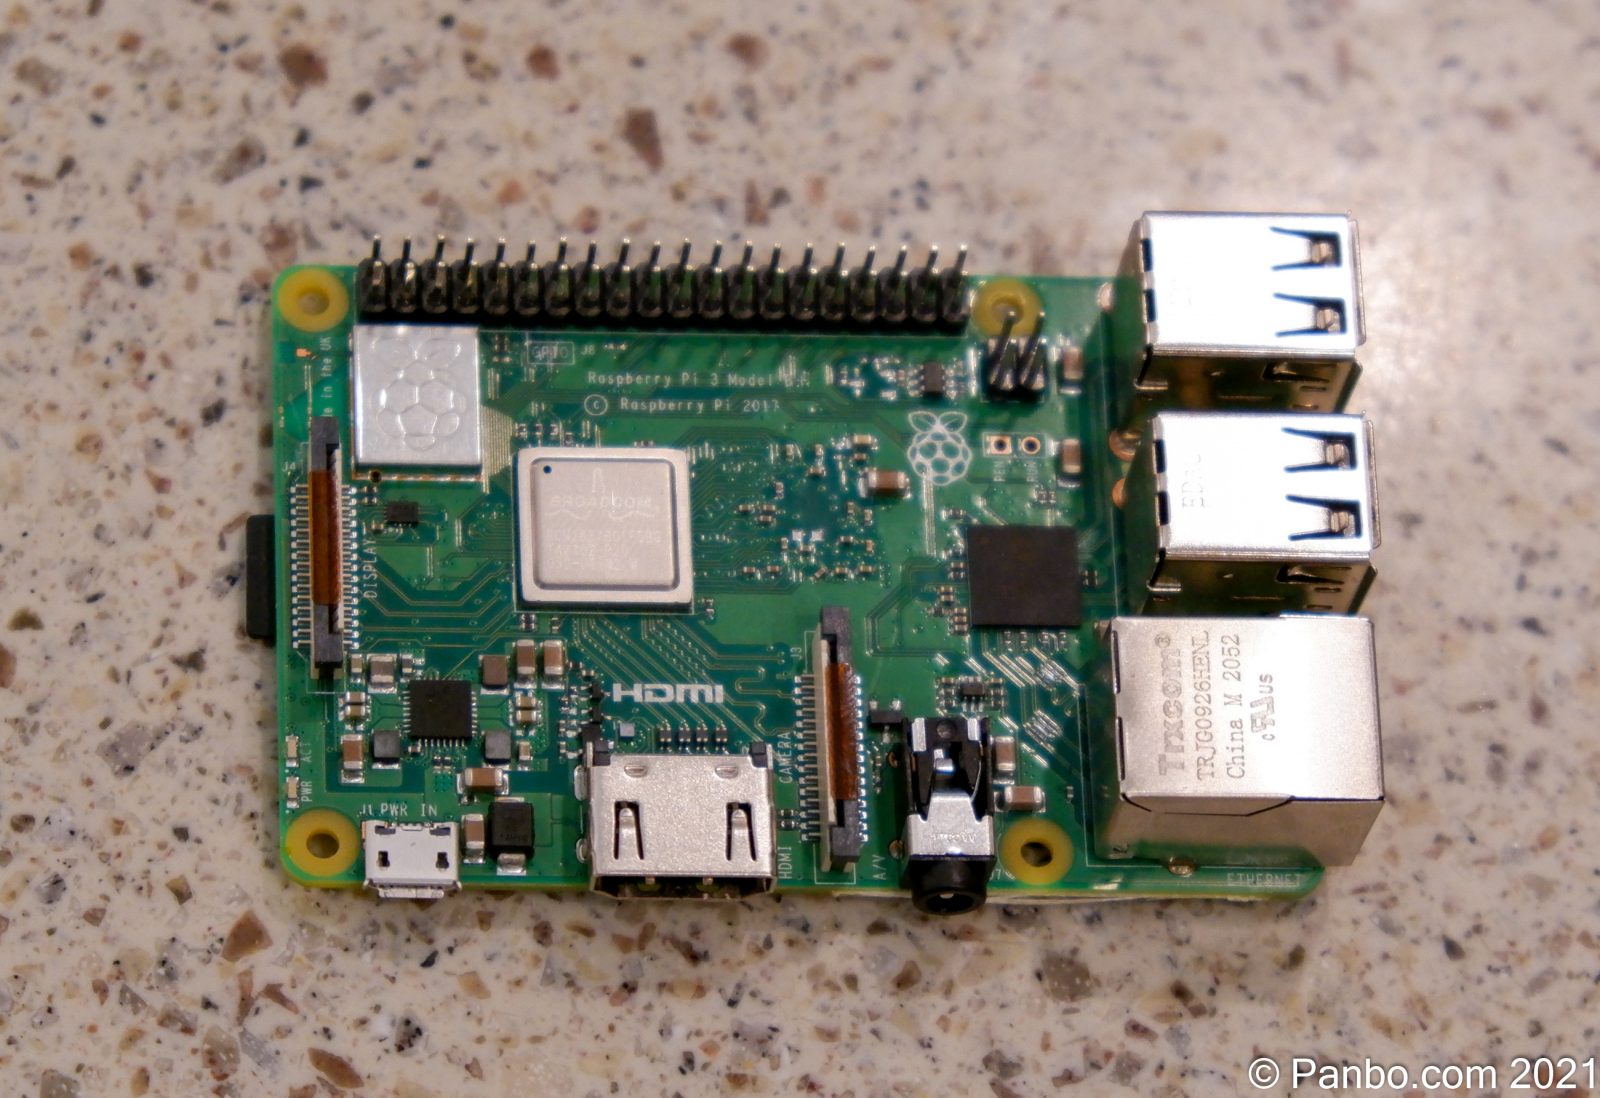
The Raspberry Pi is an inexpensive, credit-card sized, fully capable computer. It runs a version of Linux that includes a full graphic user interface like Windows or MacOS. The cheapest one can be purchased for $5 and the most expensive version with 8 GB of RAM costs $75. Pis are sold as bare boards, so you will need some accessories like a power supply, case, and microSD card to get going. Lots of companies bundle starter kits with everything you need except a keyboard and monitor to get started.
For this project I’ve used Raspberry Pi 3 B+ units. The Raspberry Pi 4 is the current unit. But, Venus OS support for the 4 is more complicated with only some serial numbers working. I did try to complete the build on a 4 and failed.
Although I’m going to concentrate on using a Pi as a single purpose device, I think it’s worth emphasizing that these are full y fuctional computers capable of serving a multitude of needs. In fact, I’m writing this article on a Raspberry Pi 400. The 400 is a Pi 4 B computer housed in a compact keyboard.
The hardware
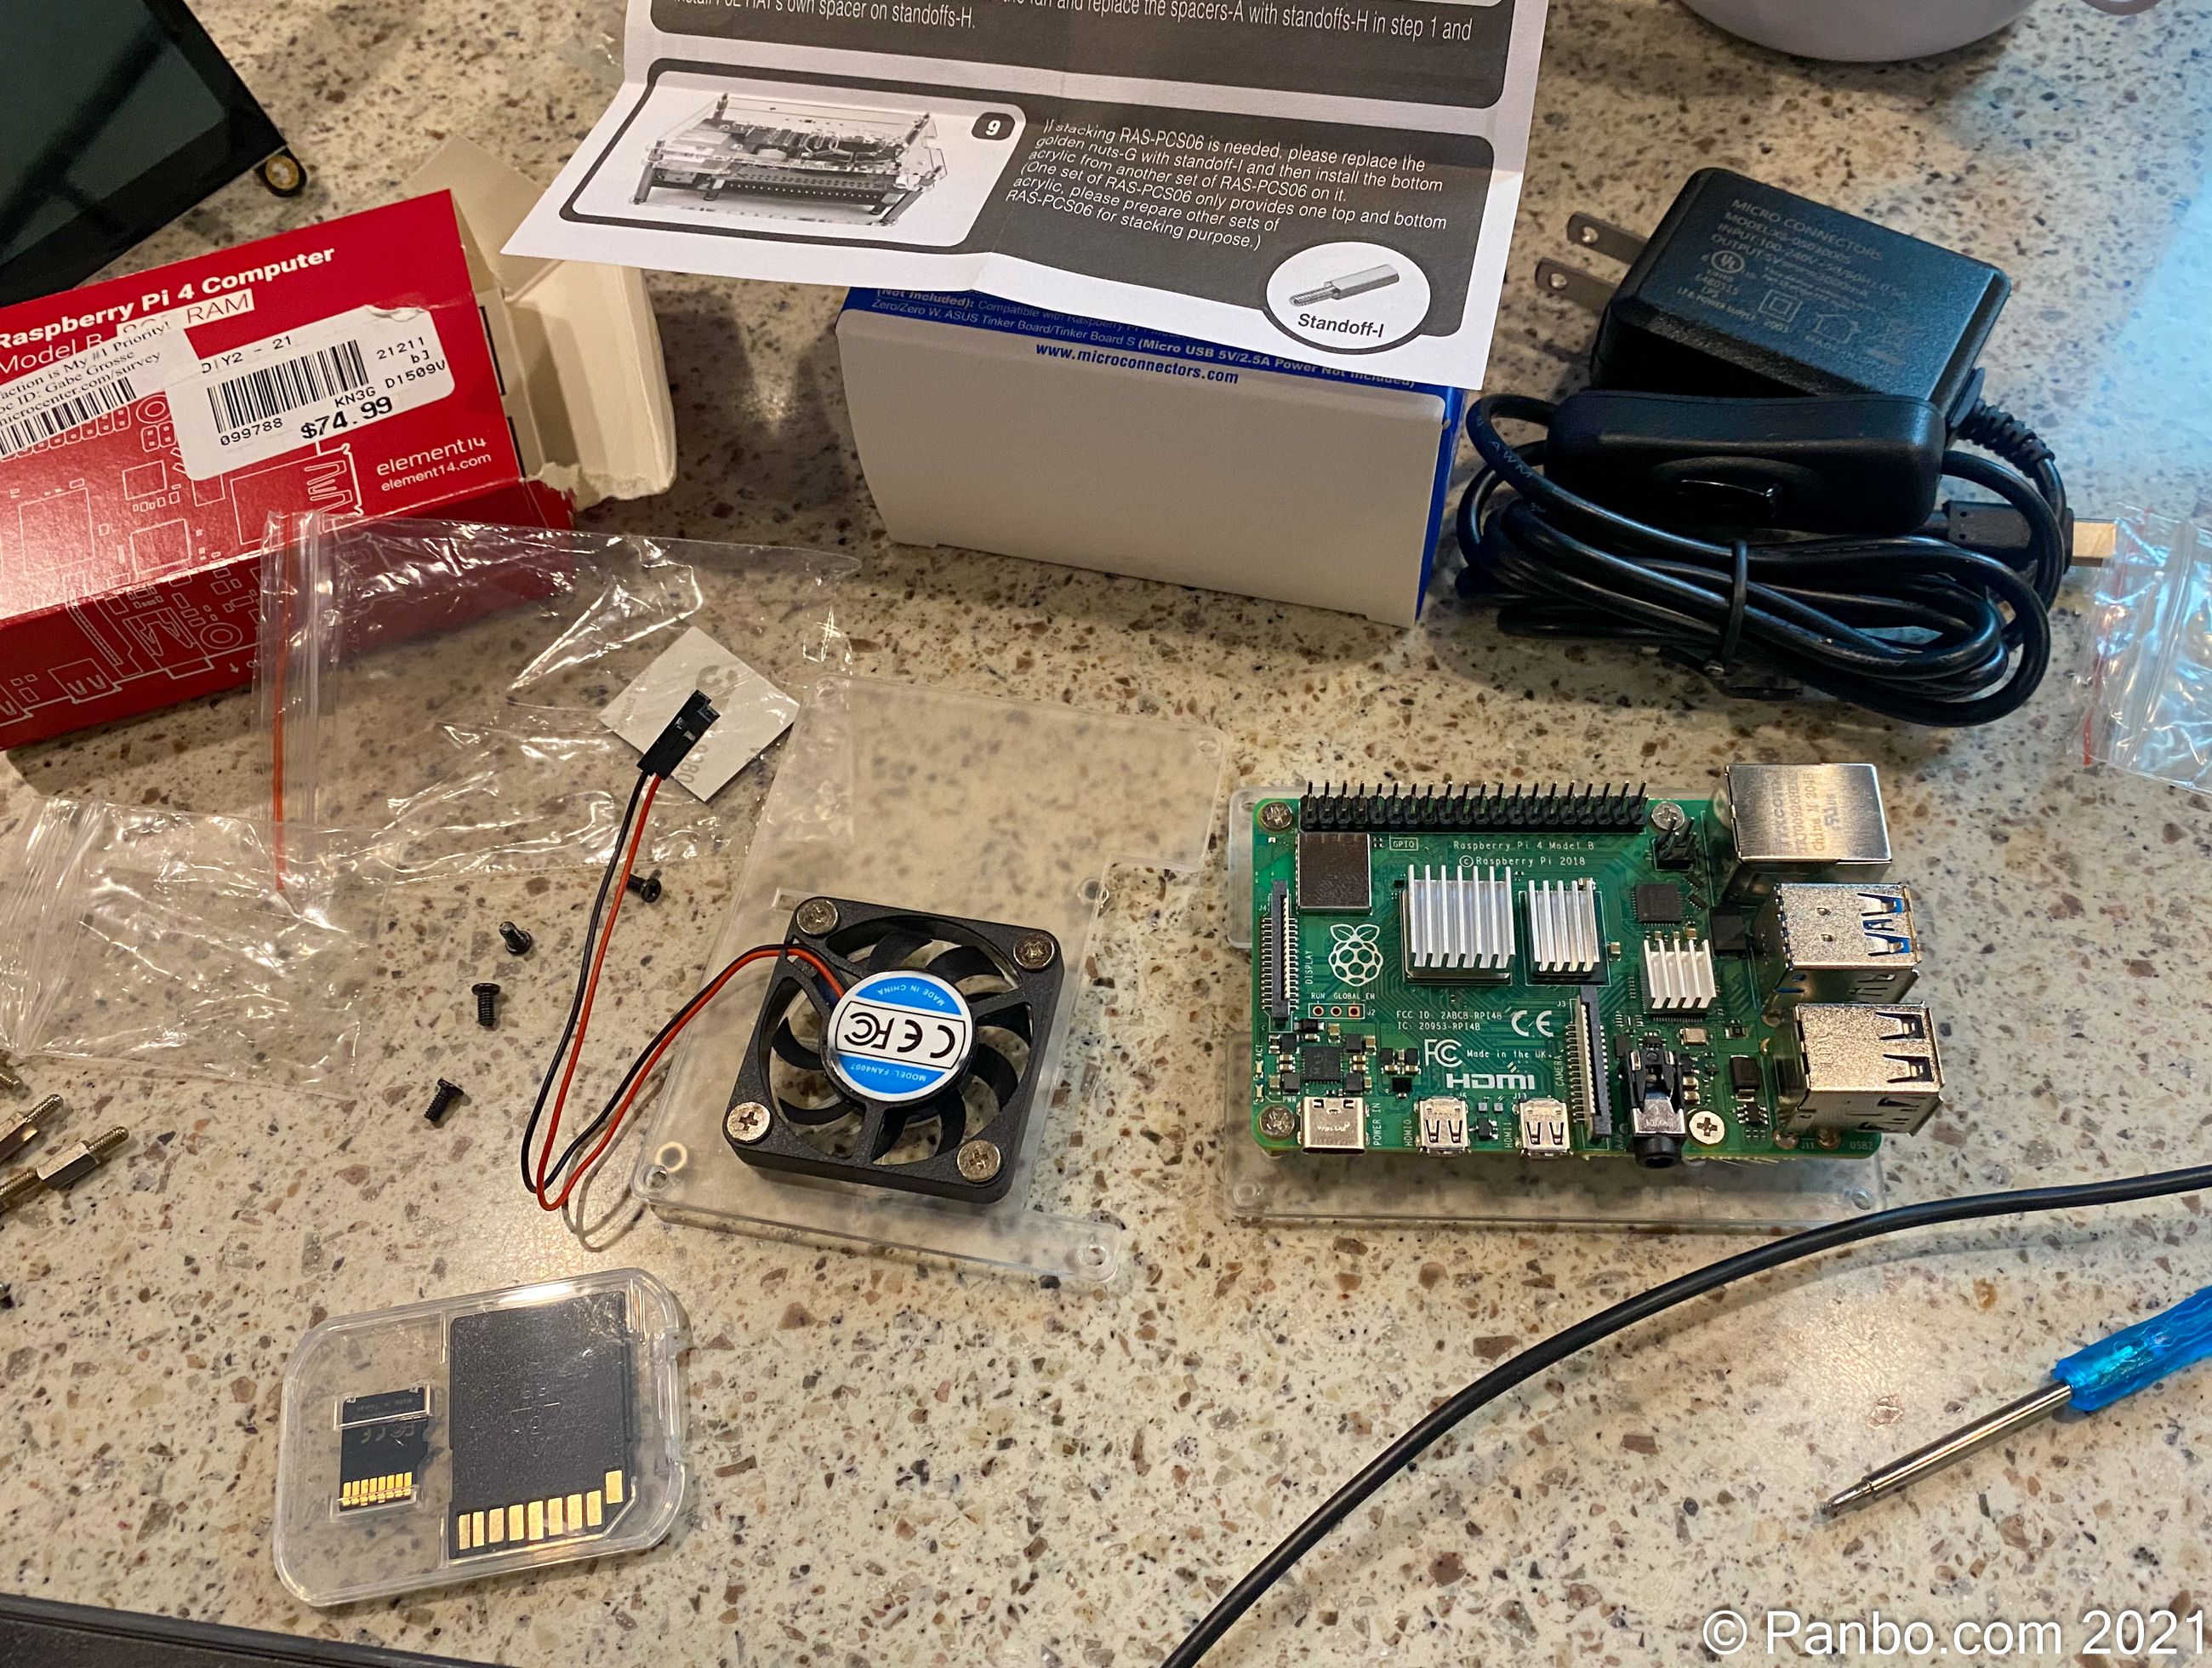
Because Pis come as a bare board with additional parts needed, you may find it daunting to figure out what to buy. Several companies offer starter kits but these often push a $35 computer over $100. Instead of a starter kit, here’s a list of every part I’ve used to create my solution:
- Raspberry Pi 3 B+ – $35.00
- 3 B case with heatsinks – $7.00
- 12-volt to 5-volt Micro USB Buck booster – $9.00
- 32 gb MicroSD card – $7.00
- Victron VE.Direct to USB adapter – $30.00 (I have two in my installation, one for the battery monitor and one for the solar controller)
- Victon VE.Bus to USB adapter – $70.00
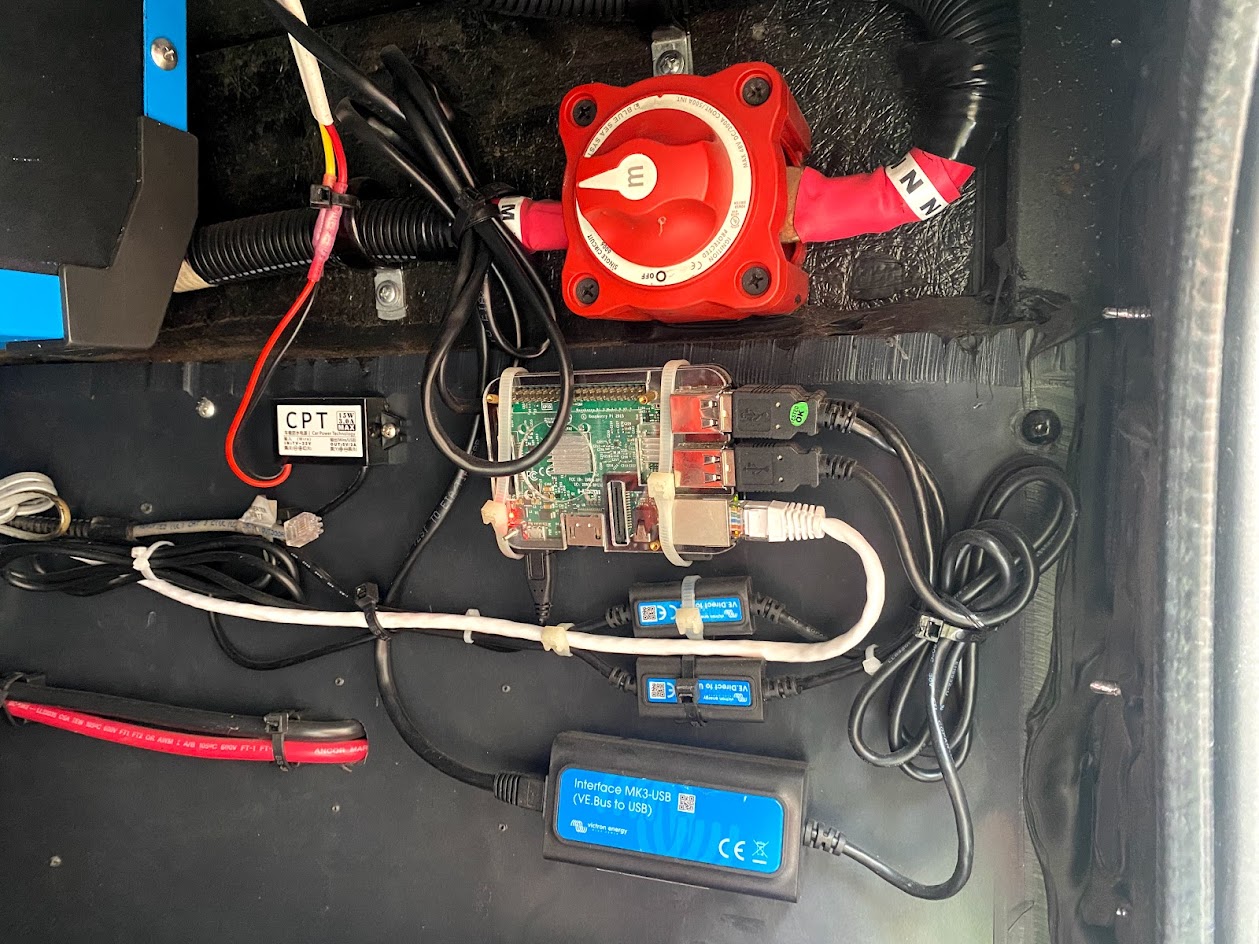
Although the headline here might be the $35 computer, let’s look at the real cost for the build. My build is monitoring a Multiplus inverter (connects via VE.Bus), a SmartShunt battery monitor (also VE.Direct), and a SmartSolar MPPT solar controller (VE.Direct). The computer, its parts, two of the VE.Direct USB adapters, and VE.Bus to USB adapter the total comes to about $188. Let’s compare that to the cost of using a Cerbo GX and the required cables:
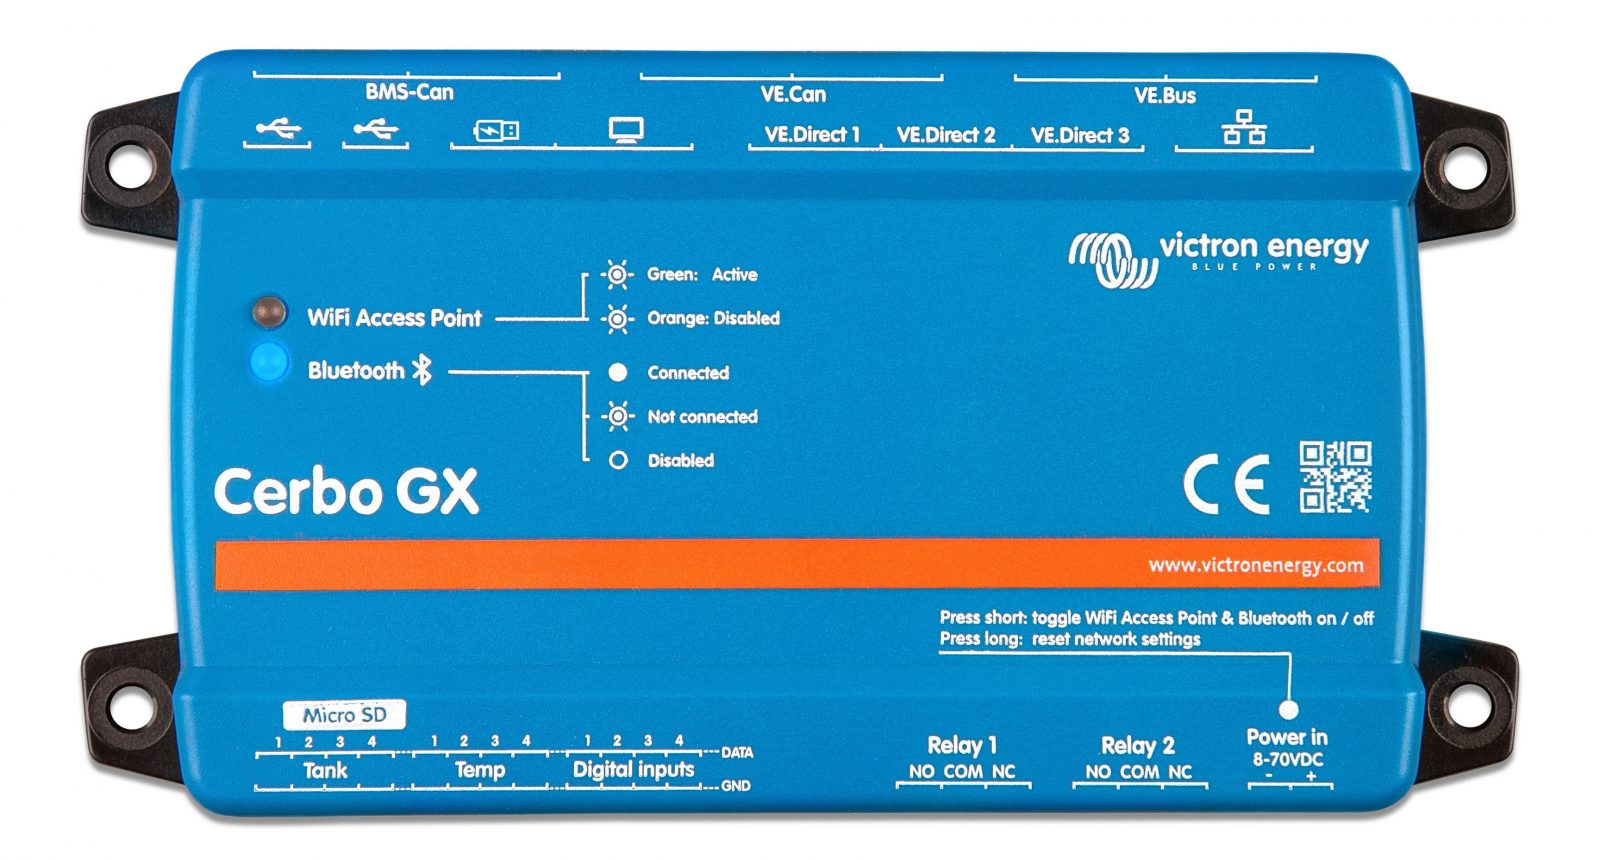
- Vicron Cerbo GX – $295
- Victron VE.Direct cable – $15 (again two would be required for battery monitor and solar charge controller)
The all Victron configuration costs about $325. A $135+ difference is nothing to sneeze at but it’s also not quite as dramatic as $35 versus $300. The biggest equalizer is the $70 VE.Bus to USB adapter required for the MultiPlus. The cost difference could vary some if you have fewer (or more) VE.Direct devices.
Cerbos have three VE.Direct, two VE.Bus, two VE.Can, and two BMS-Can ports. Plus, there are four resistive tank inputs, four temperature inputs, four digital inputs, and two relays. If you plan to use more than a small handful of the IOs on the Cerbo, it’s likely to be a better value. On the other hand, if you have a simple system with just one or two Victron devices the Raspberry Pi option can save you quite a bit. For example, a system to allow you to remotely monitor a Victron SmartShunt via VRM would cost $310 for a Cerbo ($295 for the Cerbo plus $15 for a single VE.Direct cable). The same system built around a Pi would cost $88 ($58 for the Pi and basic accessories and $30 for a single VE.Direct to USB adapter).
The install
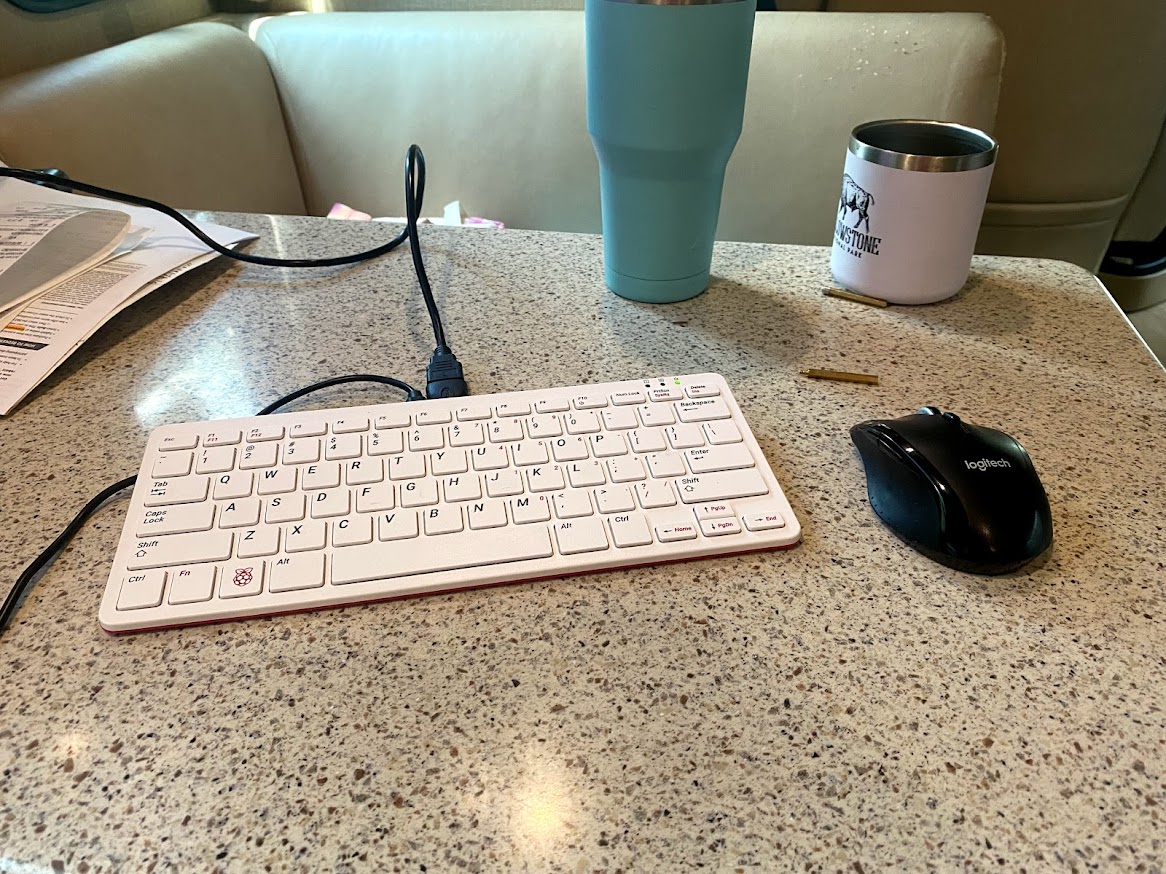
Most of the work turning a Raspberry Pi into a Venus device is in installing the software. But, before software installation begins you will need to get the hardware ready. Fortunately, this isn’t tough work. The main step is assembling the case for the computer. The case I chose this time around is just two sheets of plastic, some screw stand-offs, and a small cooling fan. The fan is probably not really necessary, The rest of the “assembly” involves plugging in the power supply and connecting a keyboard and monitor. I had a small, Amazon special, 7-inch touchscreen monitor with a standard HDMI connector around that I used for this build. But, any monitor or TV with an HDMI port will do the job.

Now that the hardware is ready for installation it’s time to move onto the software. Victron maintains the Venus Raspbery Pi project on GitHub and with it a very useful set of instructions.
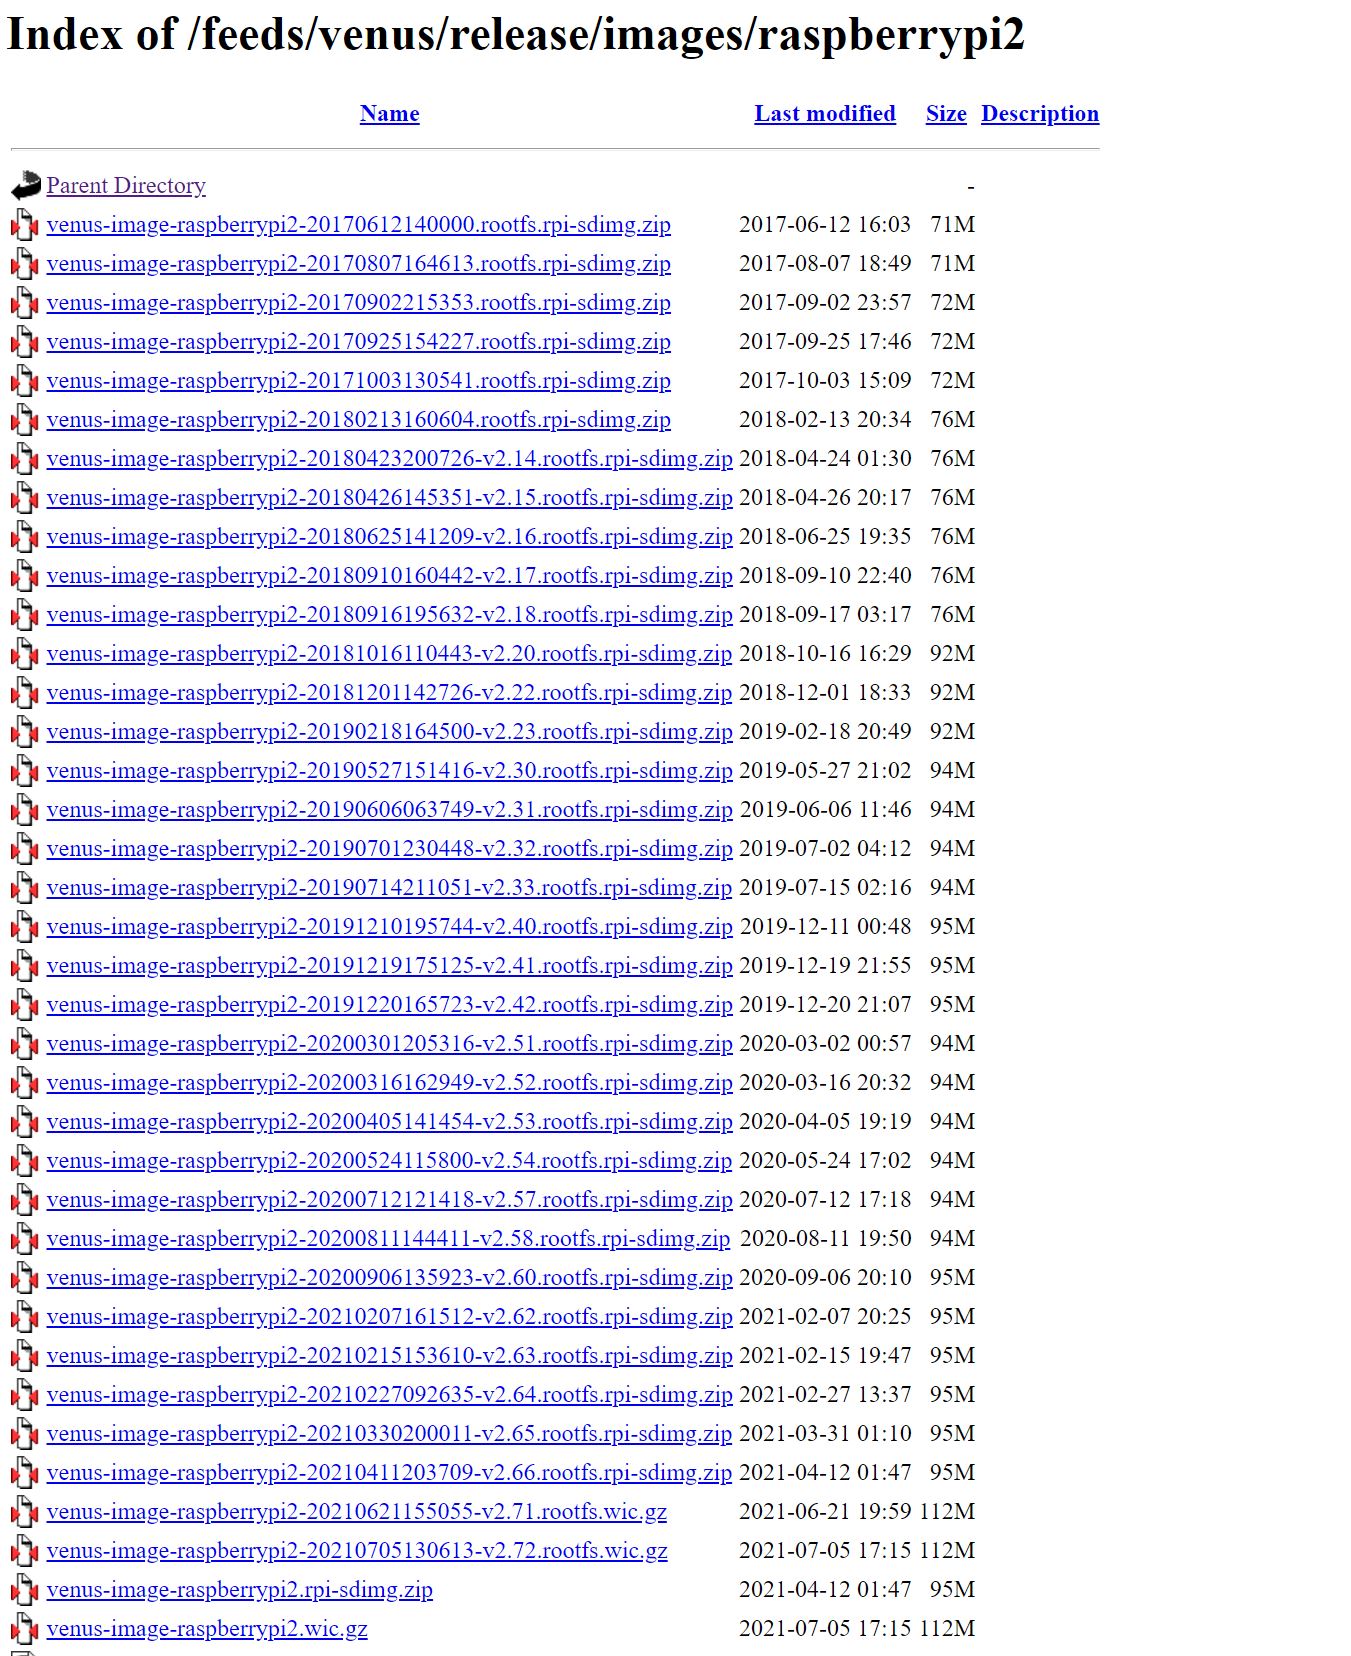
Step one of the getting started section contains a download link. Unfortunately, that link is to a directory of many versions of Venus dating back over four years. Towards the bottom, there’s one called “venus-image-raspberrypi2.wic.gz”
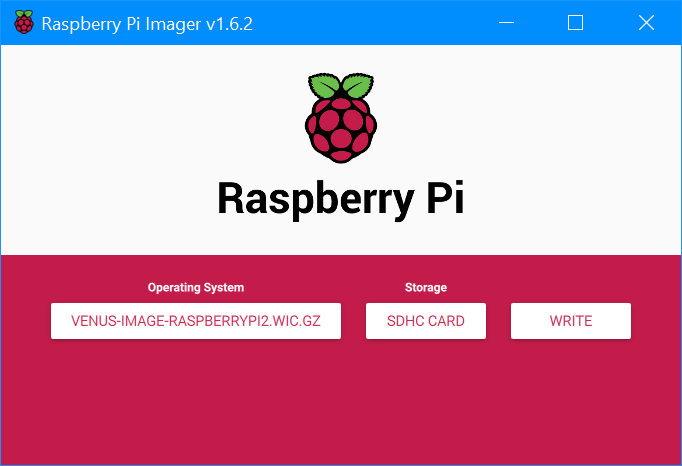
I follow most of the instructions but instead of win32diskimager I used the official Raspberry Pi Imaging tool. With the image file downloaded I opened the Pi Imager, selected the file I’d just downloaded and the MicroSD card I’d just inserted. Writing the image only takes a minute or two. Now it’s time to move the MicroSD card to the Pi and boot it up!
Configuration
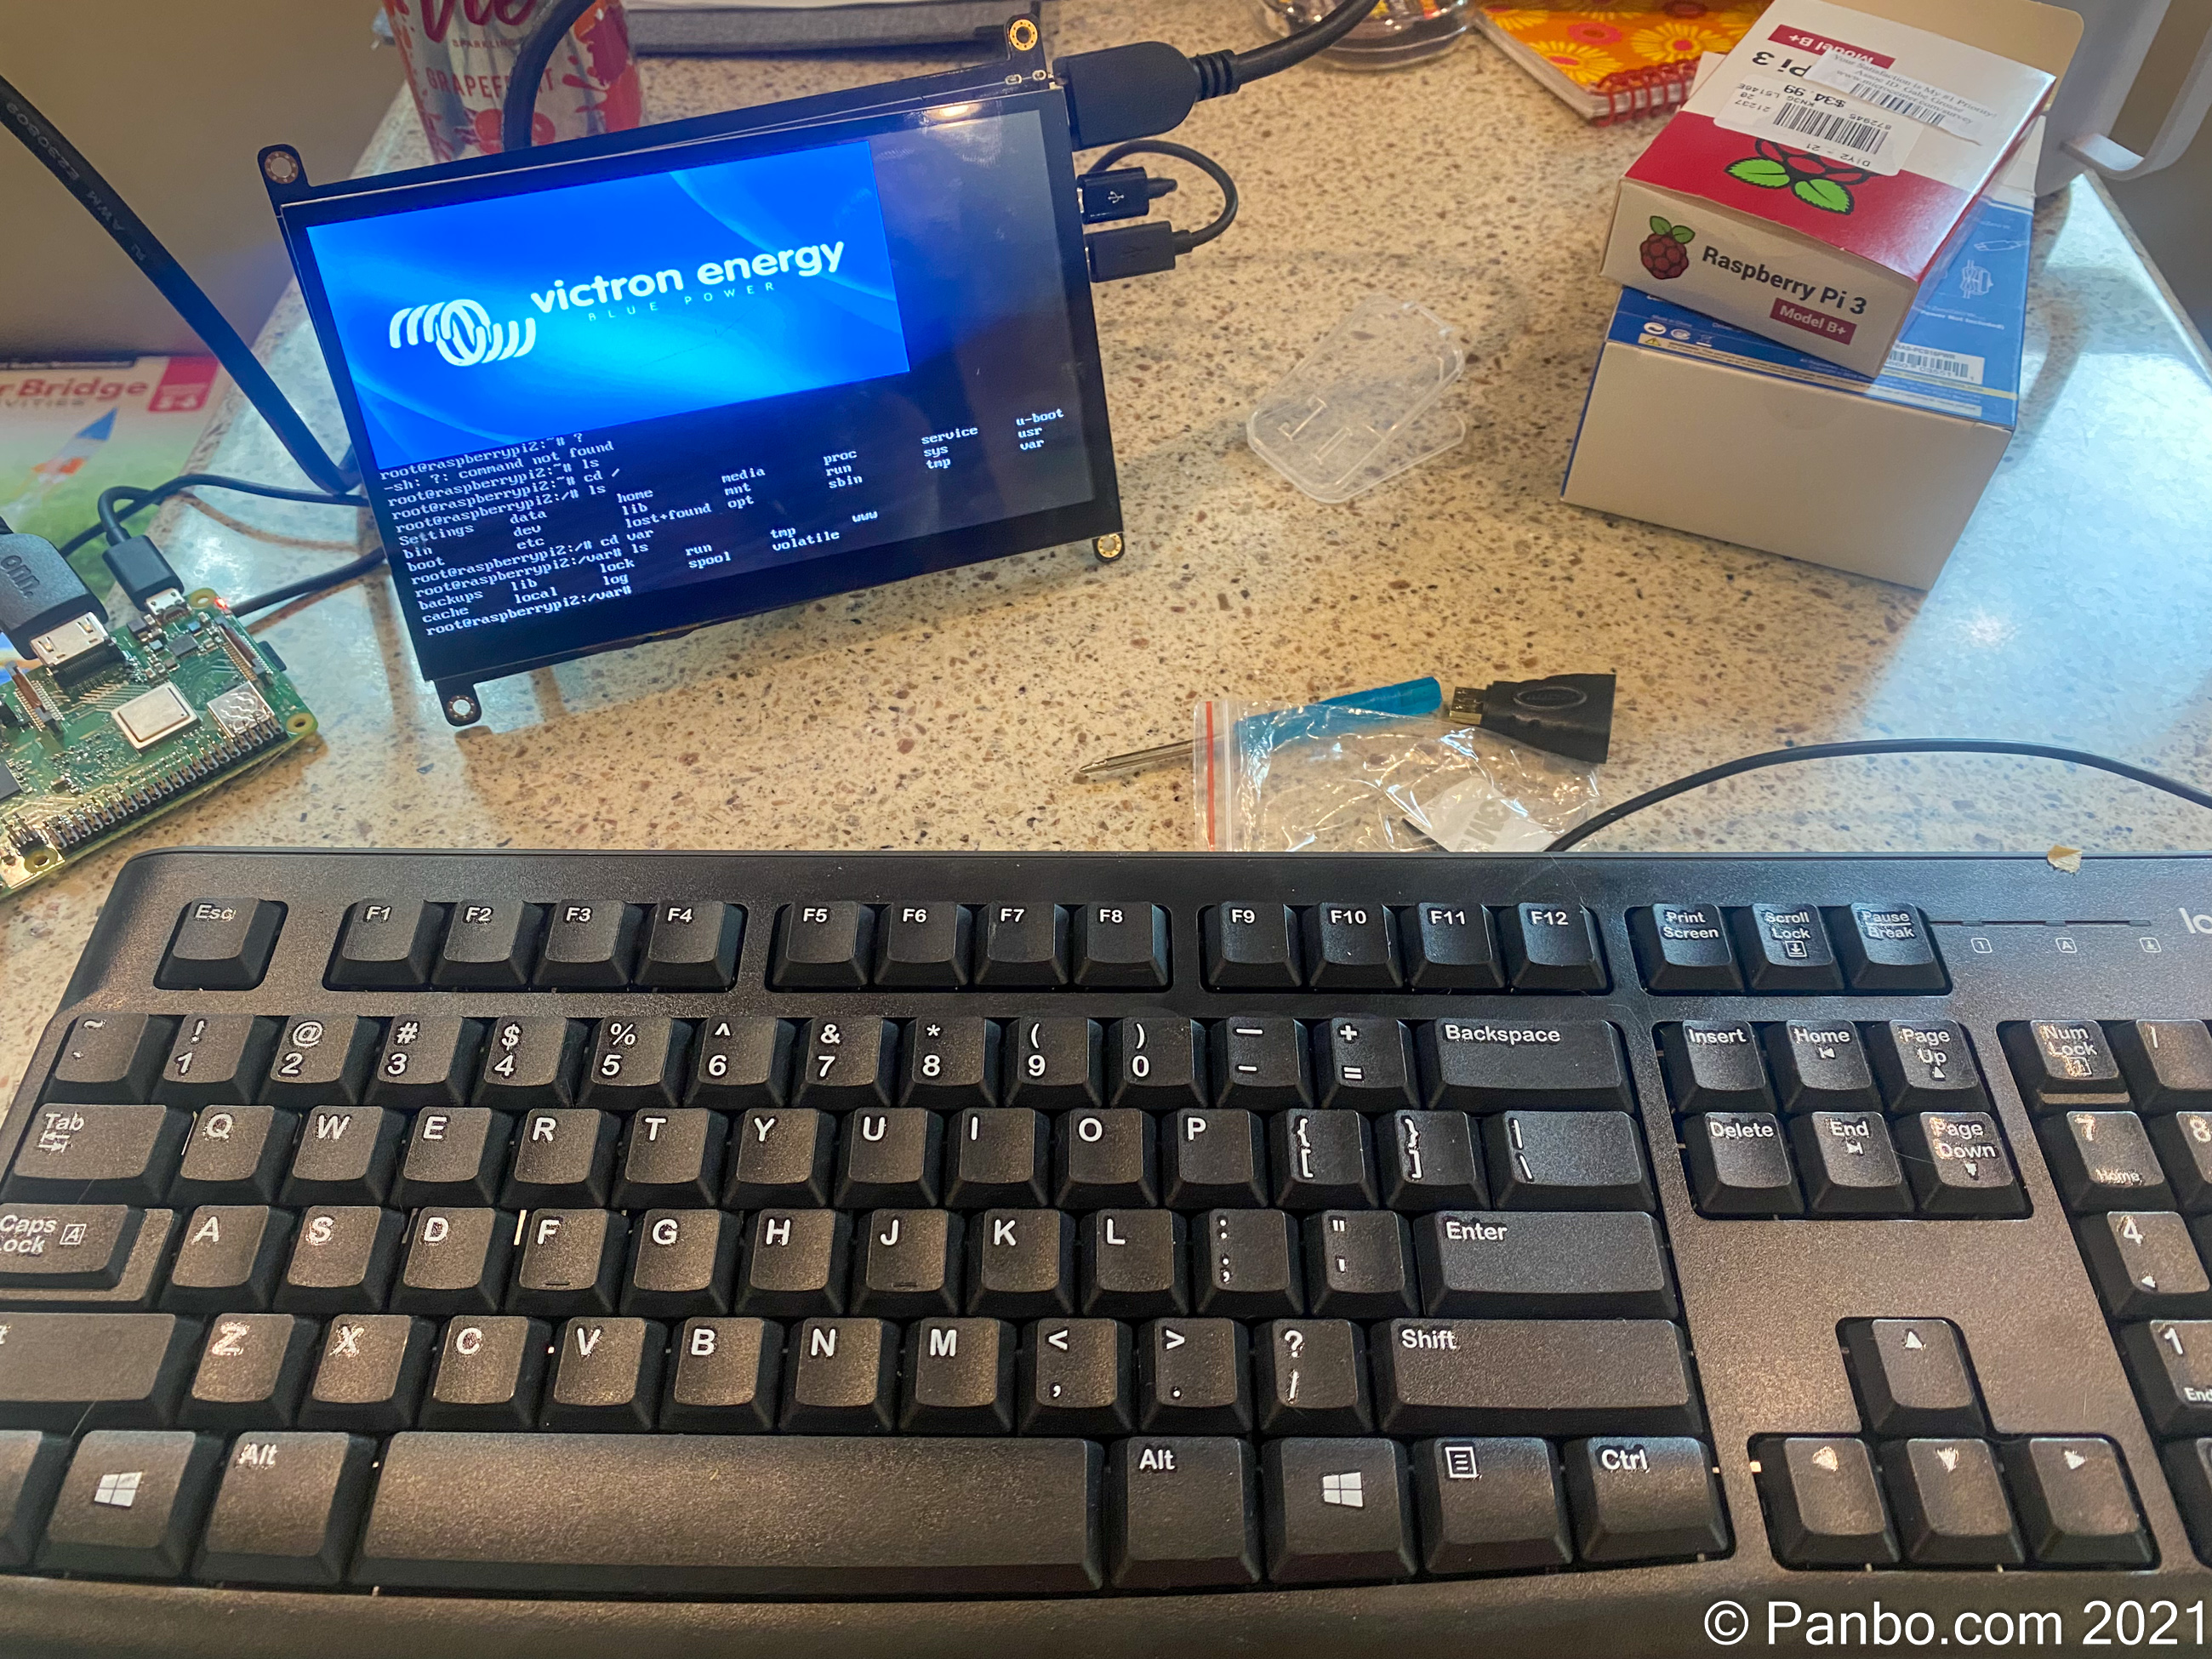
The Pi boots right up displays the Victron logo and logs you into a Unix shell. The system is now ready to connect to Victron devices — using the USB adapters detailed earlier — but, unless you’ve used an Ethernet connection, it’s not yet connected to your network. If you’re going to connect via WiFi you will need to configure your WiFi connection.
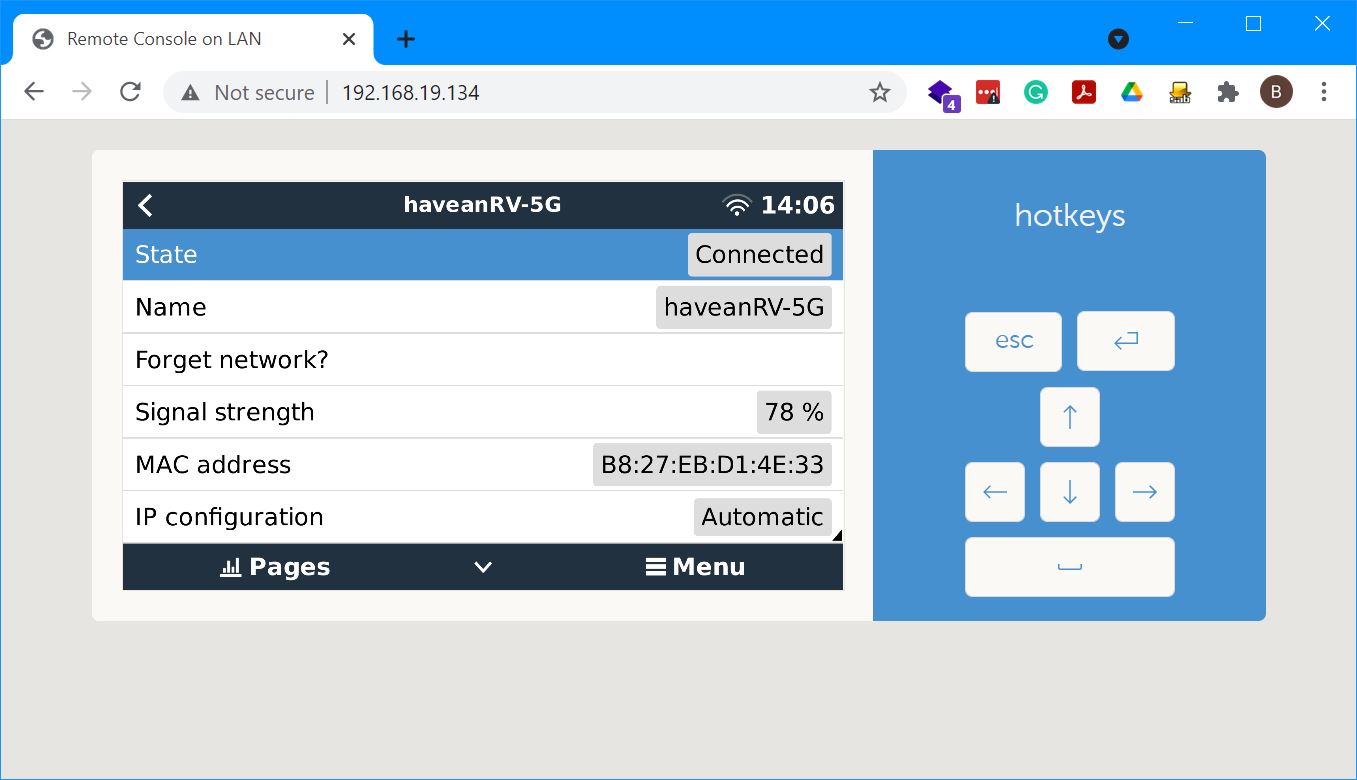
Here’s where things can take on a little more of a D.I.Y. flavor. You can avoid getting your hands dirty with the command line by making an Ethernet connection, even temporarily, and the configuring WiFi via the remote console in a web browser.

Without ethernet, you have two choices to configure the WiFi settings for your new Venus installation. You can use a command-line utility called connmanctl. With connmanctl, you will enable your WiFi adapter, scan for WiFi networks, select your target network and then provide the password for it. Or, you can configure the Venus to operate with an HDMI monitor connected. With a monitor connected, you can use a keyboard and navigate through the standard Venus menus as seen on the right above.
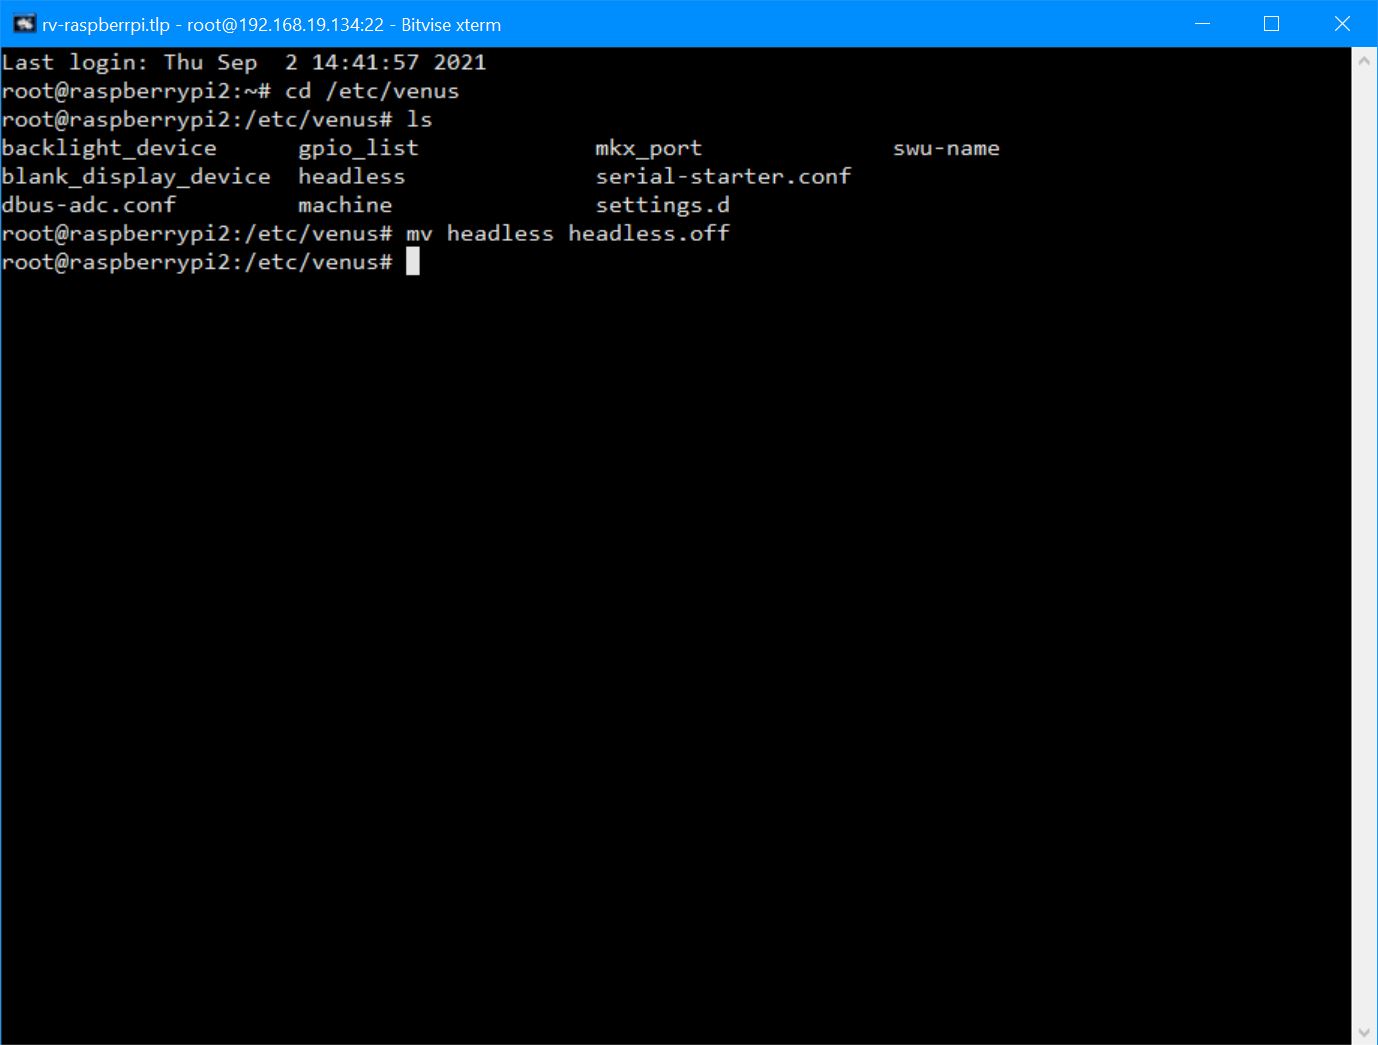
By default the Pi will boot up and display a unix shell prompt. But, you can configure it to display a graphical interface just like a Color Control GX or Cerbo GX. Configuring for the Victron GUI requires turning off what Victron calls headless operation. By renaming a file in te /etc/venus directory from headless to headless.off, we can tell the operating system display the GUI.
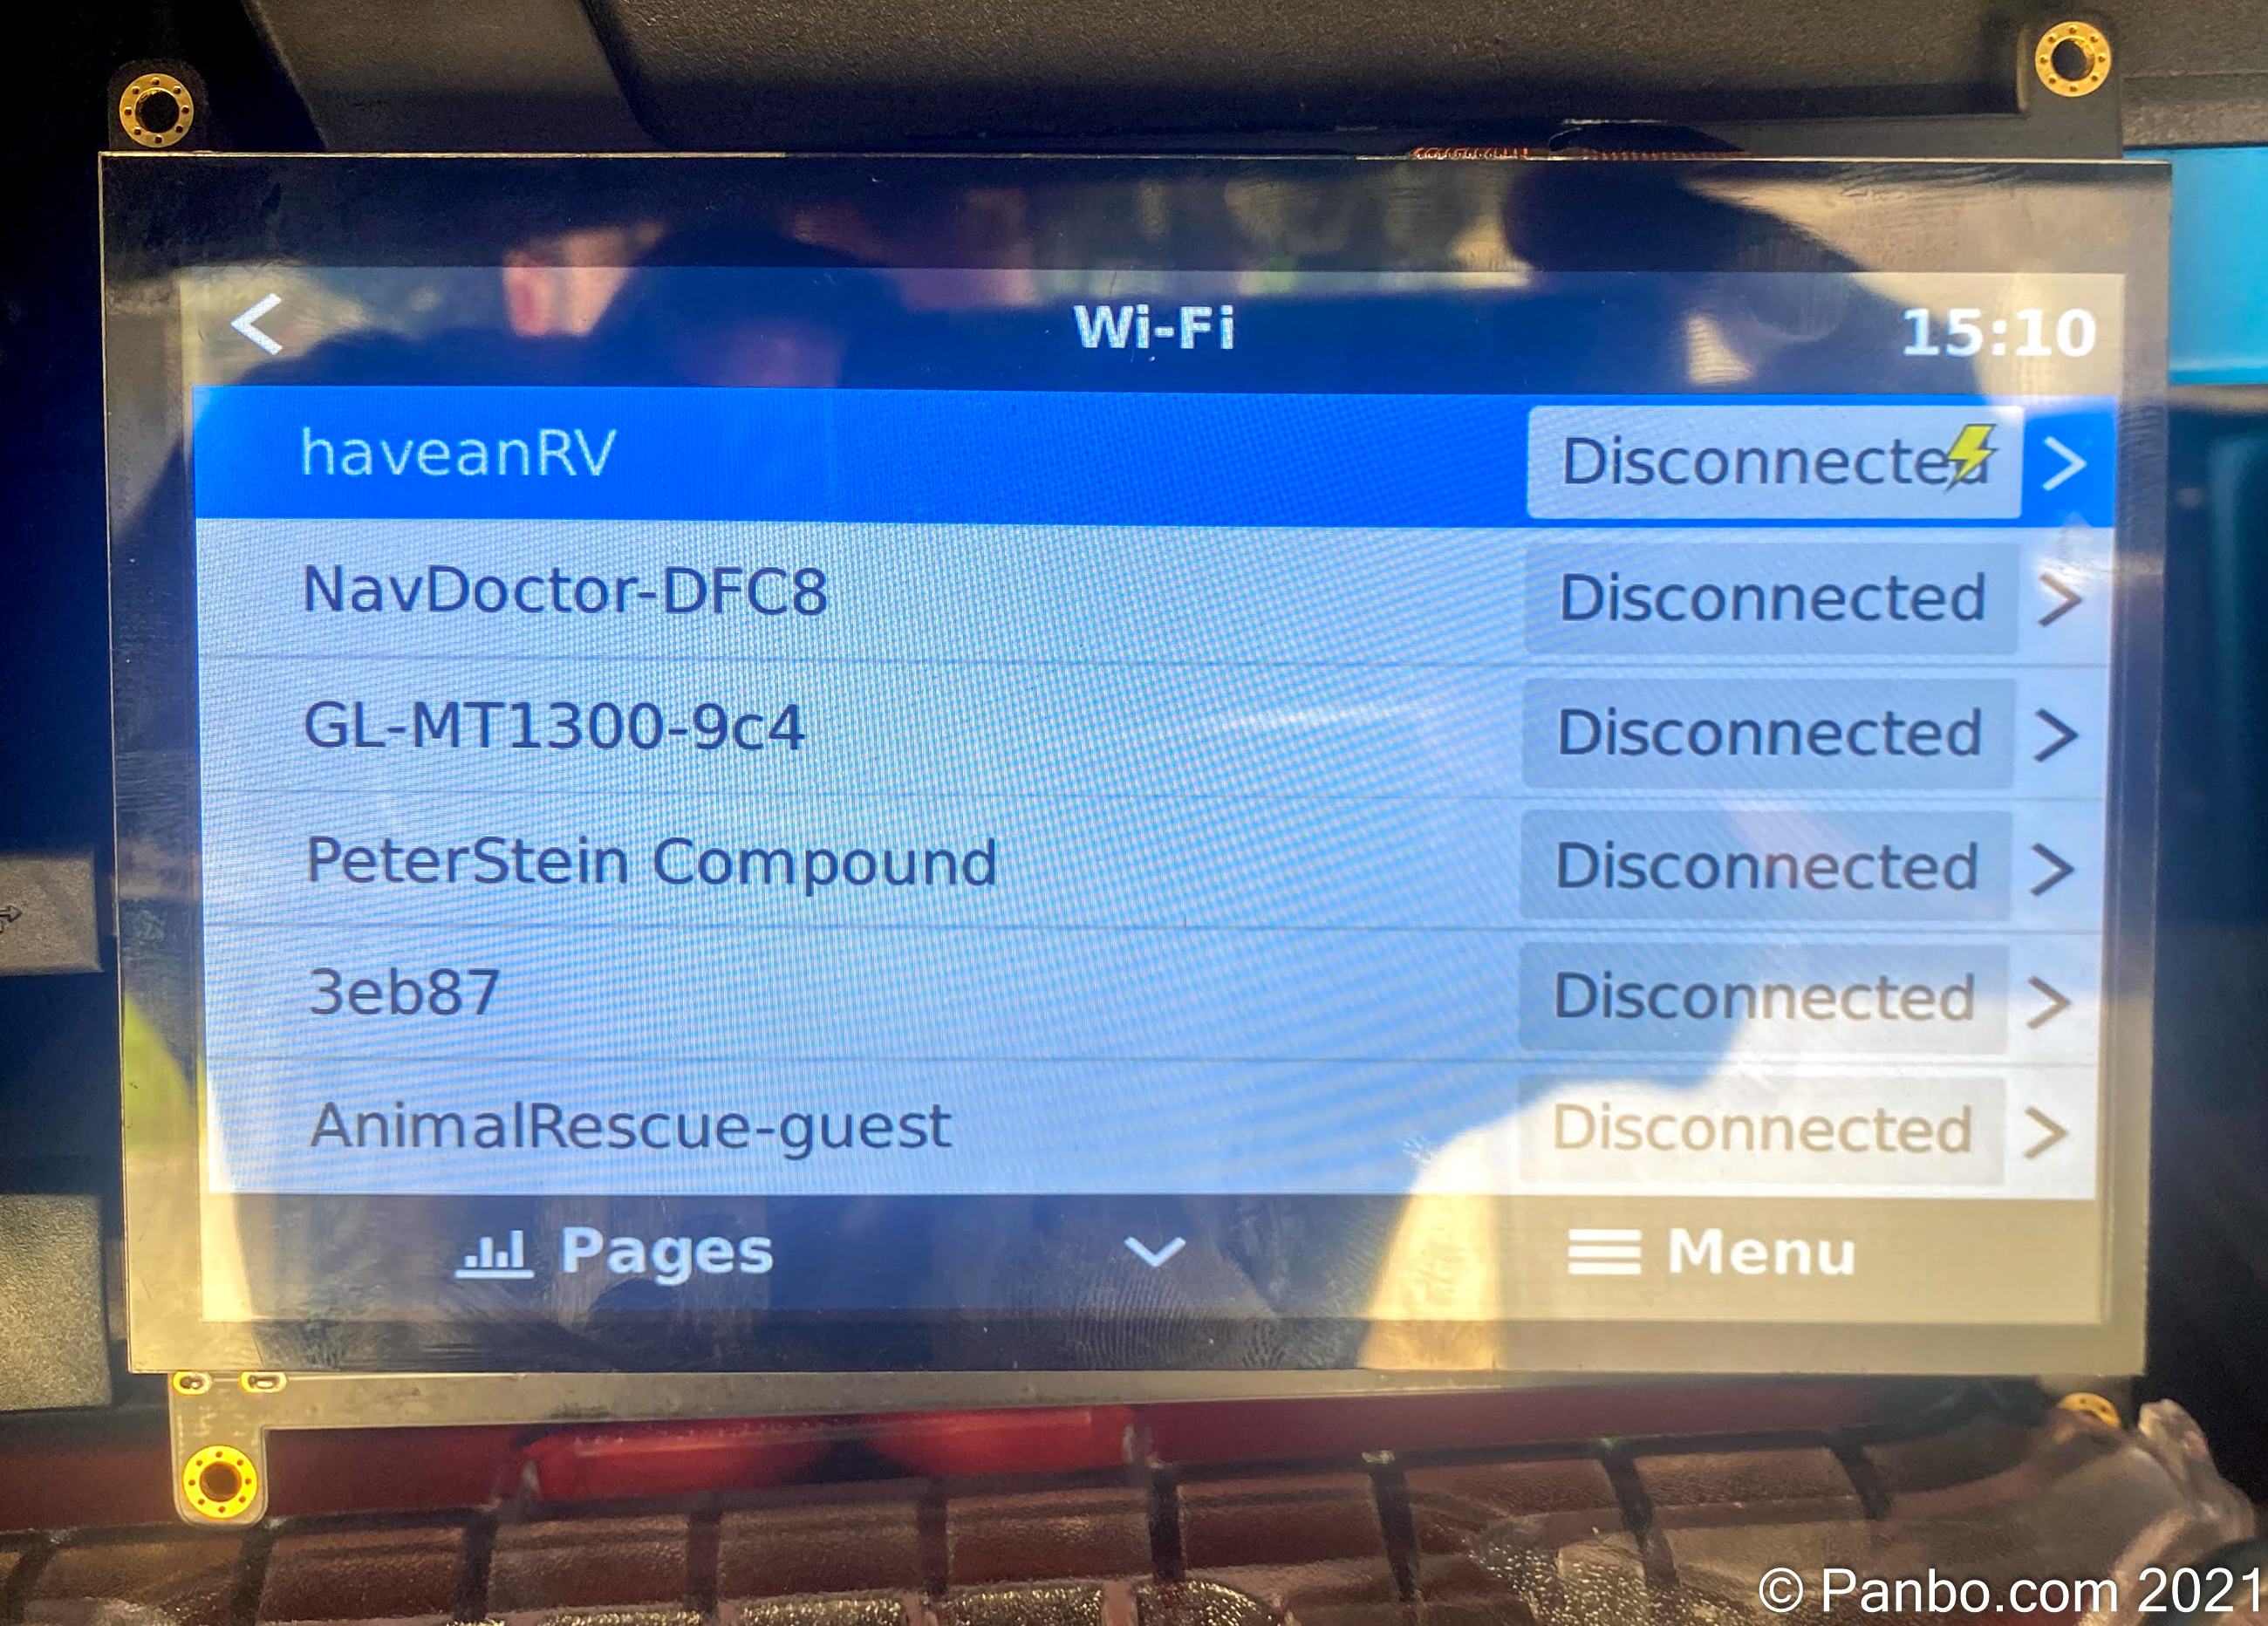
Once Venus is operating in headed (is that a word?) mode you can now navigate through the interface with a keyboard, mouse, or touchscreen. At this point, the system operates just like the other Victron Venus products. You can let your inner geek off the clock and enjoy the fruits of your labor.
Using Venus

Harvey’s Venus OS overview screen VRM Dashboard for Harvey

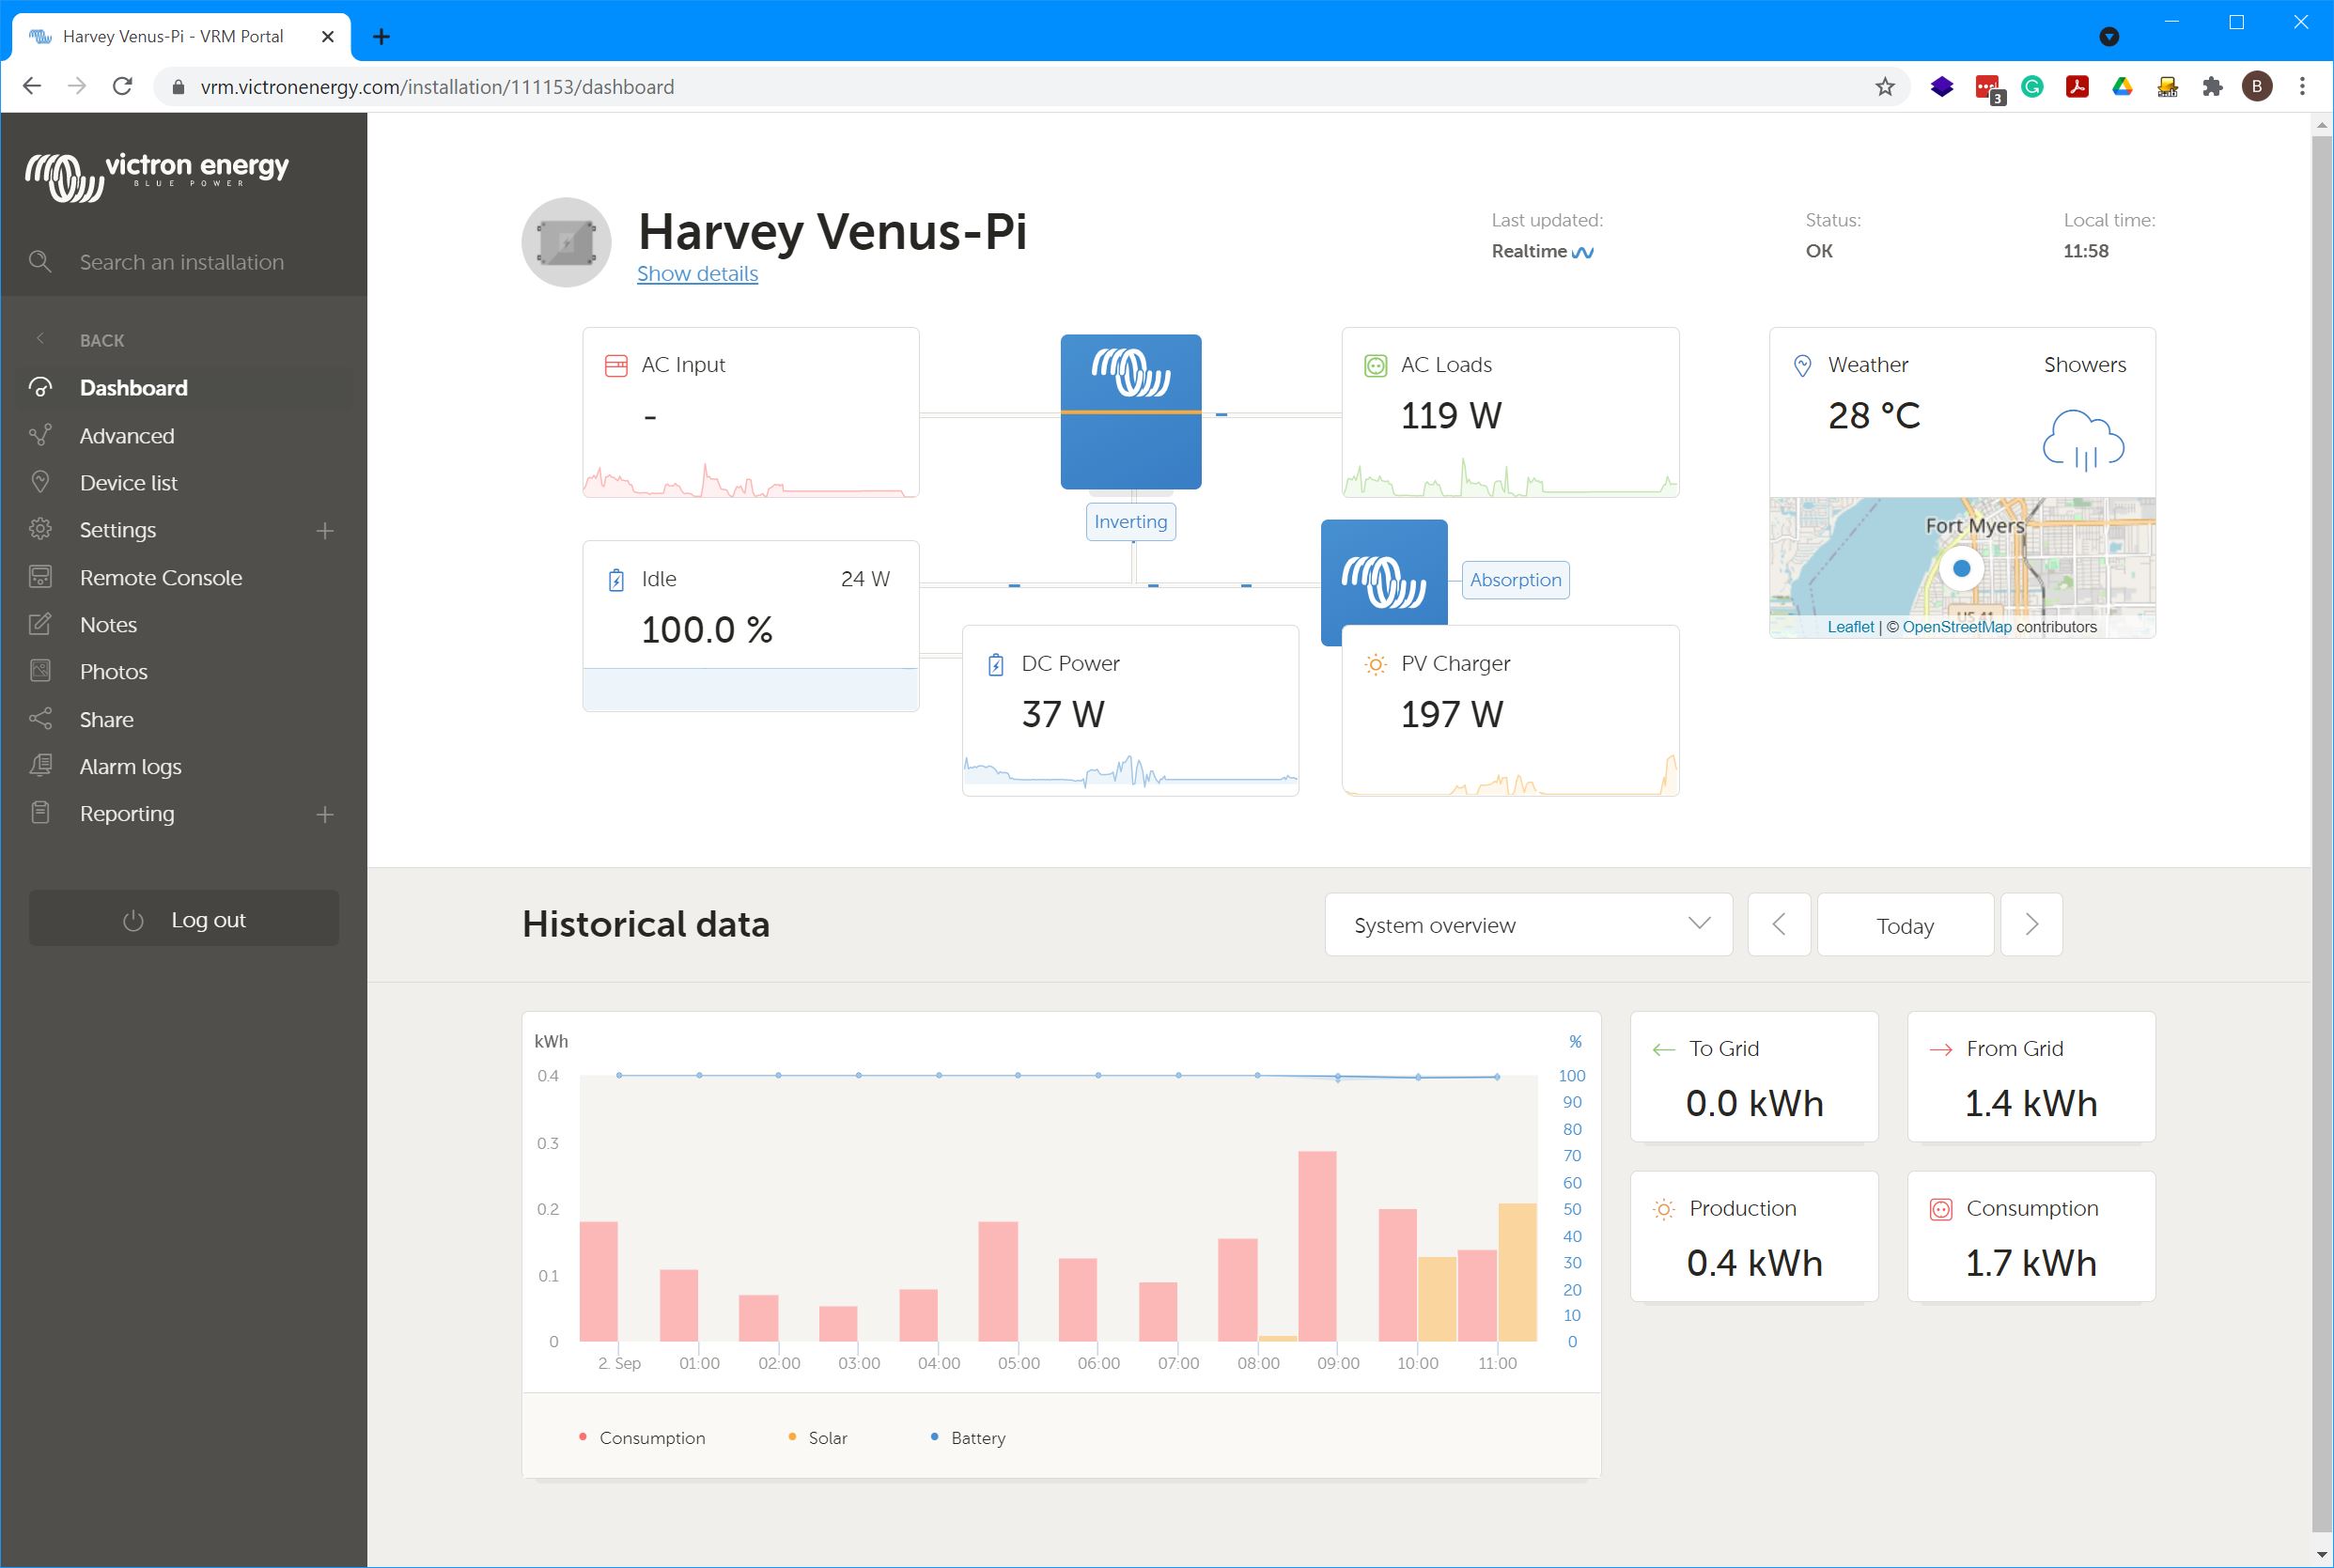
Now that you’ve got Venus running on our Raspberry Pi you’re ready to explore everything it can do. And, that’s a lot. I haven’t found a single guide to everything Venus can do, but the Cerbo GX manual and VRM getting started guide are both helpful.
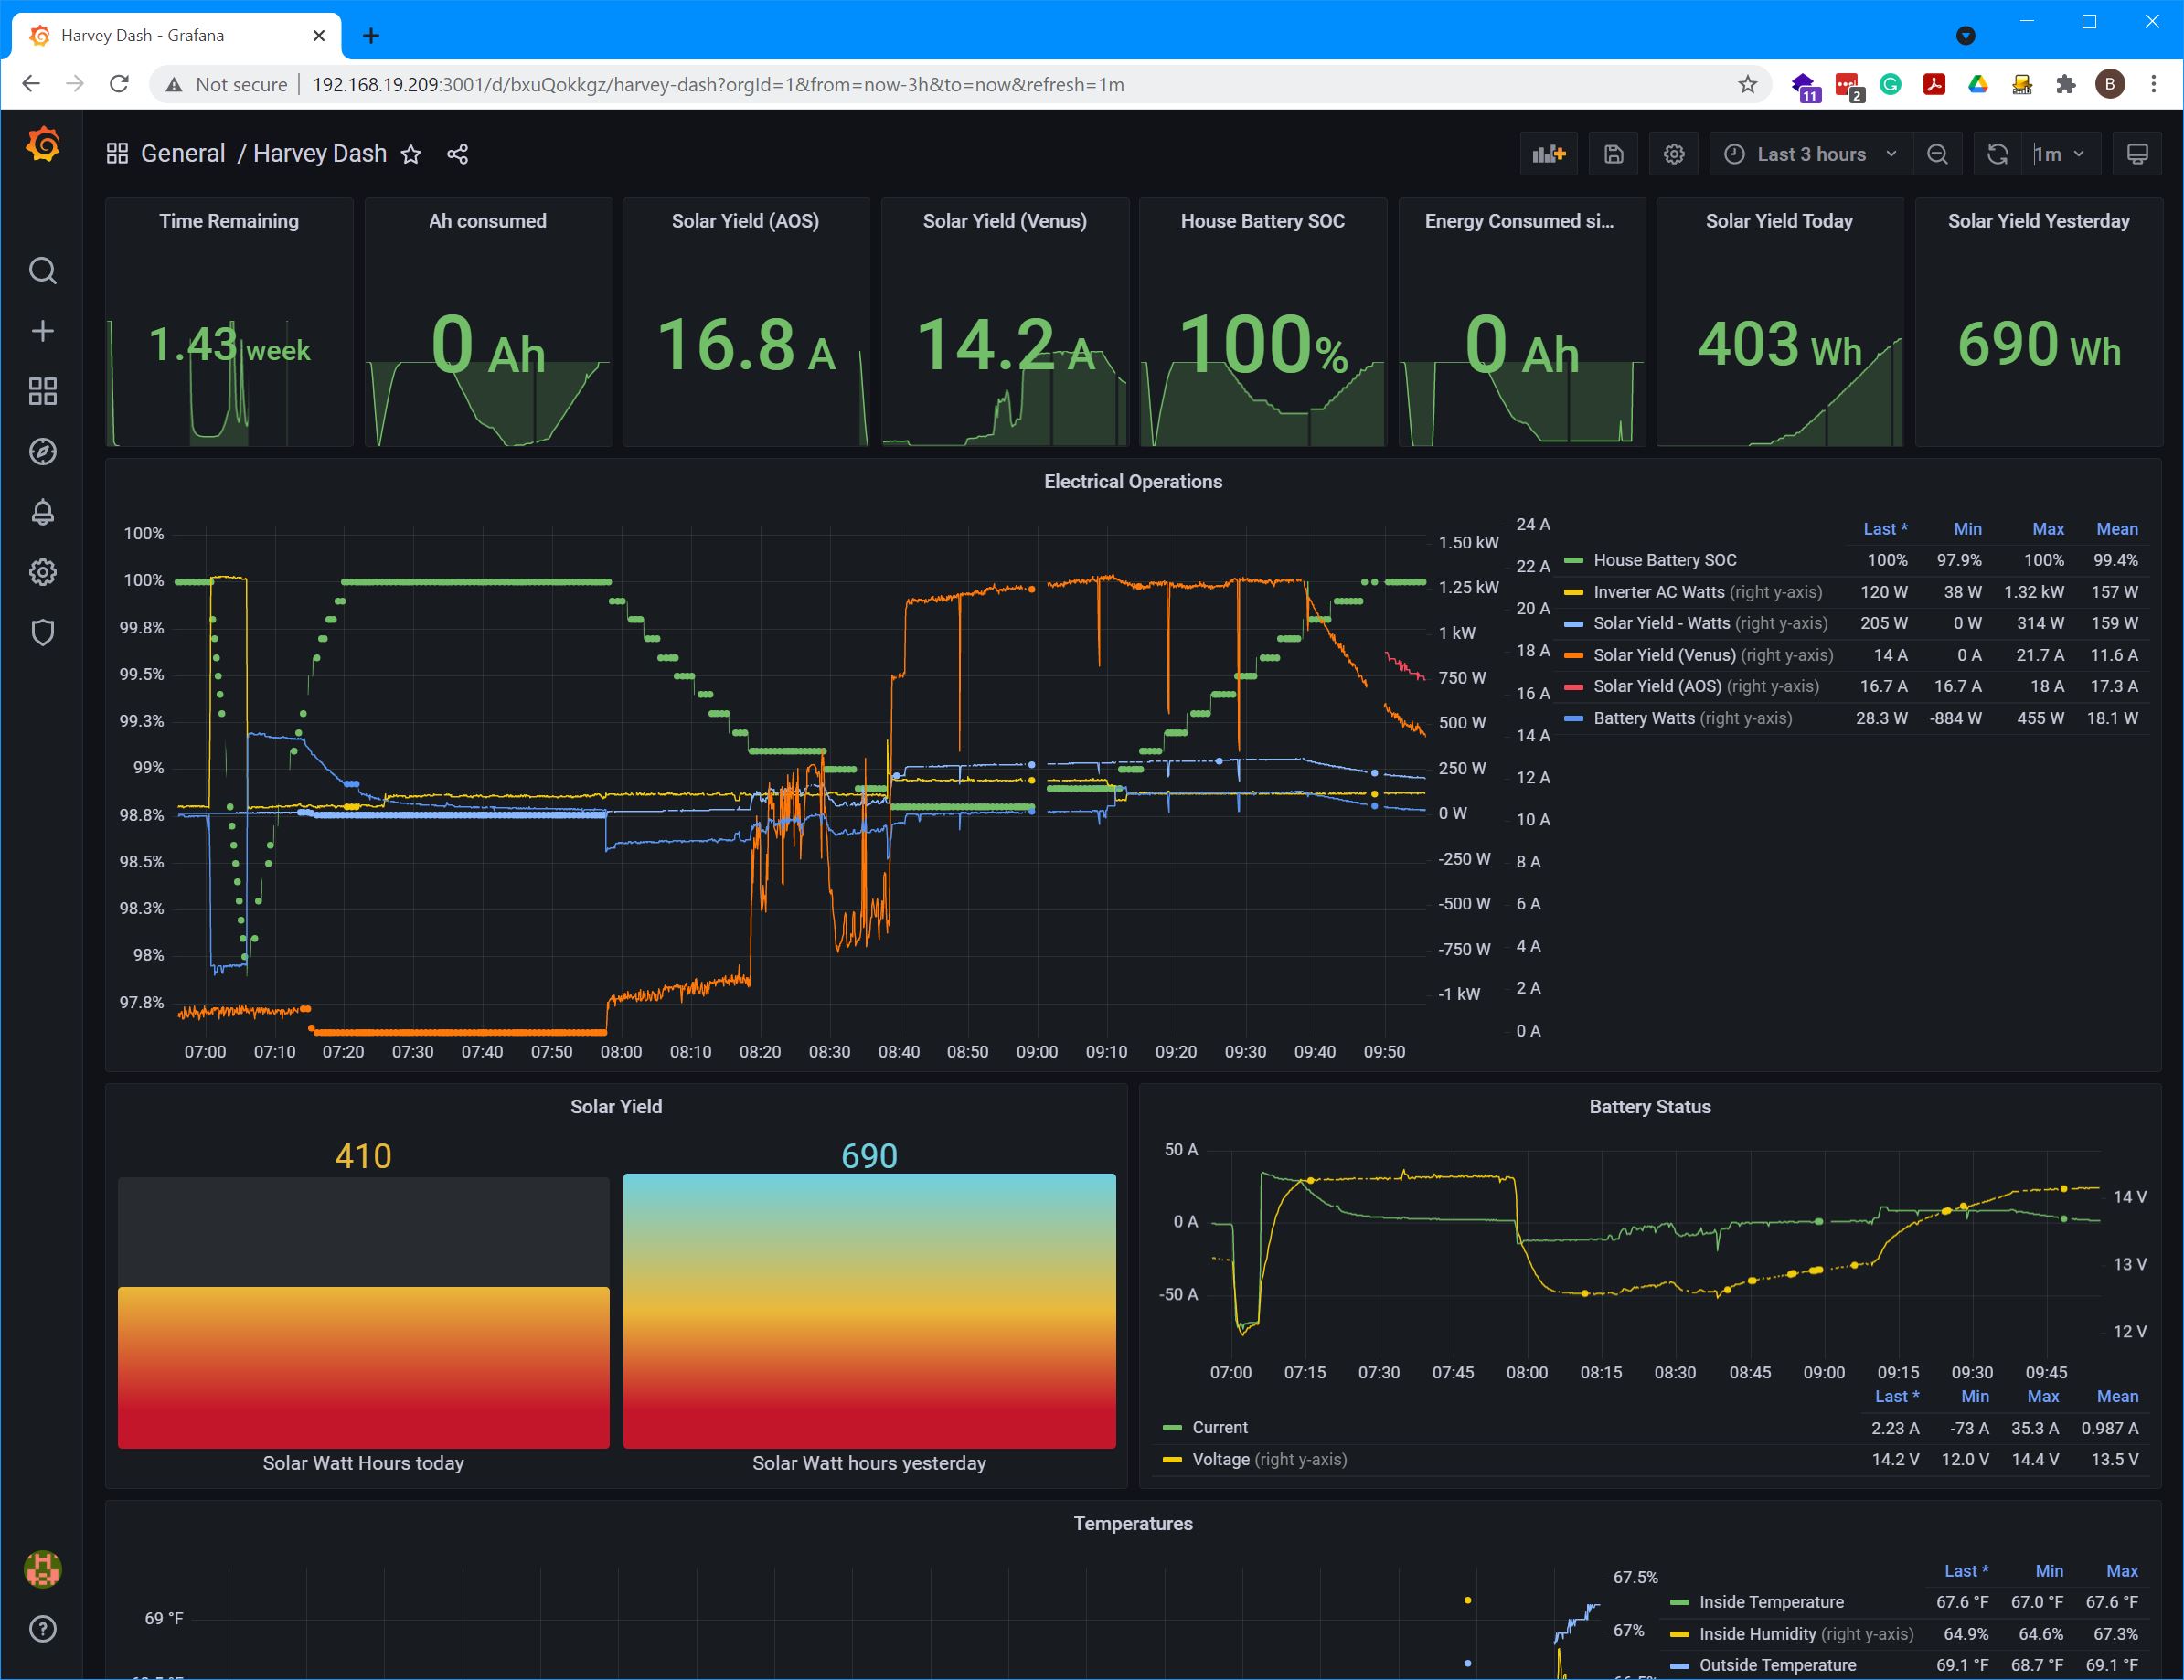
Collecting all this data enables some really powerful things. I’ve previously covered SignalK server and the amazing power it gives users to collect data, display it, and take action on it using Node-Red. Well, the Victron Venus Plugin for Signal K server adds all the data Venus collects to a SignalK instance. Now, you can graph all that data right alongside everything collected from NMEA 2000.
Victron has created a Venus OS image with SignalK sever and Node Red built-in. This image comes preconfigured with the Venus plugin for SignalK. So, out of the box it’s sharing data between Venus and SignalK. The image is available for Cerbo GX, Venus GX, Octo GX, Multiplus-II GX, EasySolar-II GX, and Raspberry Pi.
Final thoughts
Venus and VRM’s data collection, display, and storage capabilities are already an advantage to Victron’s equipment. No other power equipment manufacturer I’ve worked with gives this level of insight into the operation of their products. But, Victron doesn’t stop at just making this all availble. Instead, they also allow you a myriad of choices about how to collect the data and what you do with it once its collected. I hope this guide is helpful in getting started with your own Venus and VRM instance. I’d love to see what others have been able to create leveraging all these capabilities.


Nice write up. Have you, or anyone else, experimented with adding analog inputs to a Raspberry/VenusOS setup? I know there are ADC’s available for Raspberry Pi, but what to chose, and what about software integration with the VenusOS? The analog inputs I’d be interested in would be for various system voltages, tank levels and temperatures. Maybe forum readers could post links here if they come across any useful info.
And, the VenusOS Large image with Node-RED might help with the doing useful things with the analog data that it collects.
https://www.victronenergy.com/live/venus-os:large
A tip-o-hat to VE for supporting the DIY community!
I have a CerboGX and enjoy remotely monitoring my boat’s battery & charging systems. The Victron app even gives me n2k data on my water and fuel tank levels. Question; how do I get remote access to my n2k wind data ? Speed? Direction? Gusts? My Raymarine Axiom chartplotters display this data which originates as analog signals from the masthead sensor and is converted to digital n2k signals. Does this open source programming address other remote monitoring possibilities?
I discovered this great site through my search for solutions. I started by wanting a single system to remotely monitor my boat (victron BMV, Solar, tanks and soon an inverter charger if they can make a 120VAC compact Multiplus again) but ended up diving deeper into Signal K and other boat networking systems. I have learned alot from your posts -thank you!
Would you suggest using a Rpi 4 or would a 3B be sufficient? (I ask as I am looking to minimize the power draw – especially if i go down the route of installing an always on wifi/LTE router as well)
Barry,
Right now you will do better with a 3B than a 4. The images work on some early Raspberry Pi 4 serial numbers but more recent units are reported (at least when I last checked, which is when I wrote this article) not to be working. I was able to verify this as I tried to install on a 4 and had no luck.
Good luck!
-Ben S.
Mic, you can integrate an adc board with the common MCP 3208, and configure the device so it comes up in venus OS. You just need to add a adc_conf file IIRC. You will need to add an analog front-end circuit with the right resistor values, but Victron has shared the schematics for the BBB used in the VenusGX, so you can just copy the relevant information from there..
Nice write up – I use a RPi 2 running VenusOS to monitor multiple systems on my boat: batteries (bmv monitor), multiplus charger/inverter, smartsolar mppt, position (gps), tank levels (via adc), and also environment (temperature/humidity/pressure) via a bme280 i2c module. It’s connected to N2k network via a CAN HAT, and I can reach it via the onboard 4G router.
To Trygve: Thanks for the tip.
VE.Direct is just TTL level serial @ 19200 baud. A cheap USB TTL serial adaptor & a JST PH 2.0 4-pin connector would cost about £5. I have used this successfully with a MPPT 75/15.
Weird. I originally configured my RPi 4 (version 1.1) to run with touchscreen as per your article, got it working… disconnected it for a few days while I built a wall mount for the RPi display, MPPT and inverter… hooked it up again and now it’s running headless and displaying nothing on the touchscreen. Way I have it set up, I have to remove the entire pi/touchscreen and re-do the mv headless headless.off command… How do I ensure it will not go headless again?
Also the Victron GX touchpad is $221 on Amazon right now. You can get a small touchscreen for the Pi much cheaper and run in headless.off mode and replicate that fancy display. Thanks for the article. I’ll be trying this for a similar setup soon.
Thanks for a great article, and a great Victron contribution.
Note that the latest Victron Raspberry Pi 2.90 release has made the file-system read-only. So, if you want the Victron software to display on the Raspberry Pi HDMI output (i.e to turn headless mode off), you need to first make the operating system writeable. So, the full sequence to type at the console is:
/opt/victronenergy/swupdate-scripts/remount-rw.sh
cd /etc/venus
mv headless headless.off
reboot
For more info, see
https://community.victronenergy.com/questions/109852/cannot-change-headless-read-only-filesystem-on-ras.html
Cheers,
Andrew
Hi
Thanks for this great article. and once I extract my RPI 3 from the bird box, I’ll certainly get moving with this. One question though, as well as providing very useful monitoring functins, does Venus allow any control of its devices – in particulay I would like rememotely control the charging parameters of my mppt solar controller and for example switch it off? I’ve been unable to discover this, despite extensive searching.
Thanks again
Paul
Is it possible to use this to monitor NMEA 2000 PGNs on VRM/a Victron display? I have a Maretron ACM100 wired in @ the inlet for shore power – so before the breaker on the panel. I use that to sanity check voltage/etc… before turning on the secondary breaker, and flagging power losses via signalk remotely. I was thinking either Venus on a PI or a Cerbo GX might make a good way to monitor this inside the boat, instead of needing to bring up Signalk instruments. None of my MFDs or displays seem to read the Maretron PGNs, so my choices are a Victron Touch 50 if I can get it to work, or the Maretron DSM410 – which seems a bit dated in comparison and wouldn’t really help with remote monitoring in a holistic solution.
Everything else is (dated) Xantrex for now, with an older tank monitor system, so looking for a smart upgrade path.
I don’t think that it is possible to display data from the NMEA 2000 network on a GX device. I think Victron’s nomenclature is implying this by calling their support NMEA 2000 out. The instructions largely only discuss outputting data to the NMEA 2000 network. The only exception I see is that some inverter control is supported from NMEA 2000 to the GX device.
Here’s Victon’s manual covering NMEA 2000 integrations: https://www.victronenergy.com/media/pg/CCGX/en/marine-mfd-integration-by-nmea2000.html#UUID-8acf9d8e-abaa-4fb0-01c8-e617c2a7623f.
-Ben S.
You started this article saying that it is written on a RPi 400. Can Venus OS be installed on a RPi 400? With the current shortage of RPi’s, it is almost impossible to get one.
Venus still runs great on a Raspberry Pi 3 B+. Those units are available on the second hand market for around € 50 currently (March 2023).
Hey team does anyone know if we can run this software on banana pi or similar ? As stock is near impossible to find for the Raspberrys
Good job. I have a question.
How you can turn off or turn on the screen?
When you say turn on or off the screen, do you mean enable the graphic display like what you see on a Color Controller or Cerbo with a touchscreen attached? If so, the answer is you need to disable headless mode. There is information in the article above, just search for the word headless.
-Ben S.
What I say is that for example if I want to turn OFF the screen because I don’t need to see the information for example. Like a screensaver.
Thanks for such a great article.
can’t we connect to the devices, example a mppt with bluetooth, using bluetooth instead of using a VE.Direct to USB cable ?
Unfortunately, at least as of now, you can’t. Venus OS doesn’t support a Bluetooth link to devices. So, you have to make the connection via VE.Direct, VE.CAN, or VE.NET.
Best,
Ben
Is this true for all of Venus OS? I see for instance BMS integration for Venus OS that supposedly supports Bluetooth: https://github.com/Louisvdw/dbus-serialbattery#dbus-serialbattery
Thanks for the great article.
Am I safe assume the VE.Bus to USB adapter can be used to plug my Epoch460ah into my VenusOS Pi? The CAN connector on the Epoch cable is used for this, correct?